Author Archives: anachostic

Rack Redux

Last year at this time, I was building my studio and acquiring gear at a pretty good clip.  Some of the new synthesizers I was buying were rackmountable. and I was a little turned off at the cost of buying a prebuilt rack to house them in.  After consideration, I thought maybe I could build one of my own.  It shouldn’t be hard.  It’s a freaking box.  It’s got four sides.  You have a saw and screwdriver, you should be able to do this.

I do have all the tools you would need to accomplish this, and I had a few minor woodworking projects under my belt already.  I had built a shitty platform for my washer and dryer.  I had built a couple of sunglasses racks as well.  I think I was ready to try this.  Spoiler alert, it’s not exactly cheaper to do it yourself, but the satisfaction sort of makes up for it (that’s always what they say, isn’t it?)

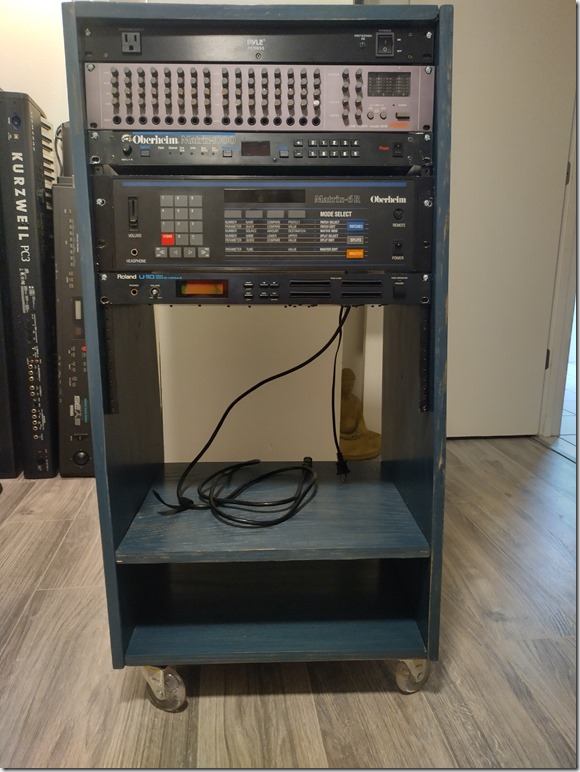
And so I built my first rack.  It was 12U rack with an extra shelf.

IMG_20230327_202801_HDR

Oddly, the stain I chose was supposed to be a light grey (kind of like the floor) and was actually blue.  Whatever, it’s fine.  It’s not like once I started applying the stain I could just undo it.

And this rack served me pretty well for that year.  I outgrew it quickly, though, and I wanted more space.  I needed more space because I was starting to gather up rackmount effect units.  So I began making mental plans to build a second rack.  This old rack would then be dedicated to effects and the new larger rack would be all synthesizers.

The old rack had a capacity of 12U.  I decided to go big this time and bought 22U rails.  Another thing I didn’t like from v1 is that the floor and shelf of the rack are from some extra scrap wood I had around and this time I wanted the whole thing to have the same wood finish, so I bought extra panels to cut up.  I ended up using 3 of the 4 sheets, so my wood cost went up by only 50%.

I got by by using my 20v tools the first time, but the circular saw was pretty underpowered for the job.  More than once it stalled out cutting through the wood and it never seemed to keep a straight cut.  So this time I bought a high-power corded saw, which is an additional up-front cost, but will be used much more in the future, I’m sure.  I also have a corded drill and when I need that level of power, it’s very nice to have that option.  And the saw did a tremendous job.  i was able to cut the slant on both sides sheets at once, so they are perfectly matched.

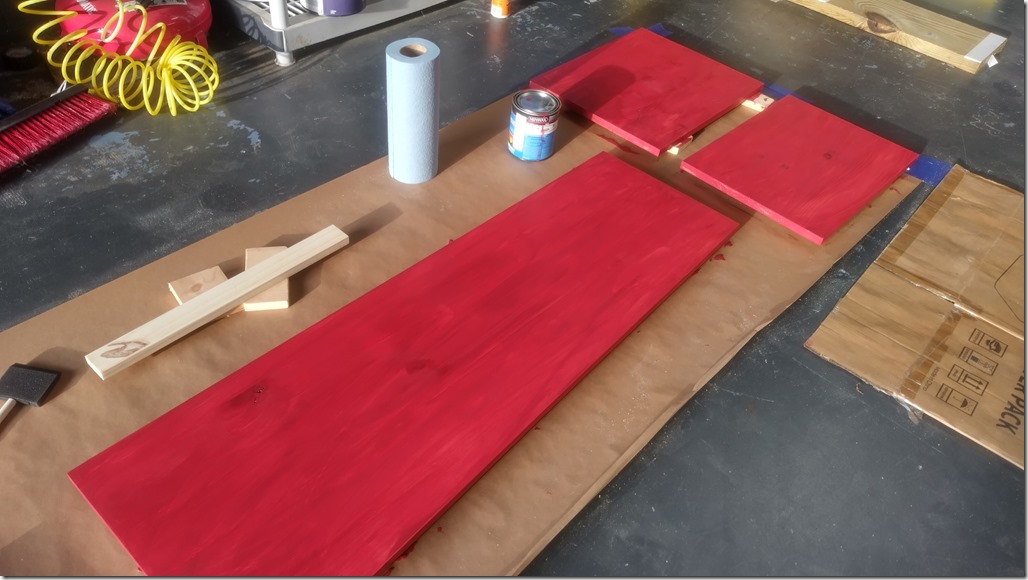
I have wheels from a previous project that I can use, and I’m going to use pocket screws again because they seem really strong, and also because I have a lot of them on hand.  I’m going to double the number of screws I use for extra strength this time.  I’m not going to forgo the wood glue this time.  It makes a world of difference.  I have poly sealant from last time, but I didn’t think I had enough blue stain to cover the new larger size (48" high instead of 38"), so I bought some new stain.  This time, red.  Not red like cherry wood, I mean cherry RED.

IMG_20240317_183822_HDR

Taking some cues from Nord Keyboards, for sure.

Once this is done, as is tradition, it’s only the start of the purchases.  All the equipment from the old rack will be moved to the new one, and that will work as-is.  but when I add more devices, I’ll need to add a second rack mixer.  There’s going to be more devices to power, but I already purchased a larger power strip for install from Woot, who listed one recently, conveniently enough.

Then, looking at the population of the old rack with the effect units that are piling up in my closet, I need to buy a new patchbay to route them.  I have a power switch that I had purchased a while ago from the same place I bought the Roland U-110 and my 32 channel mixer.  And additional power will be available from the power strip already installed in it.  Other than that?  Cables.  Bunches more cables.  Cables to connect the effect units to the patchbay, and maybe some mid-length cables to route between the synth patchbay and the effect patchbay.

And here’s the new rack:

imageimage

With all the gear swapped out and organized

image

Of course, like every picture, it’s always out of date.  The FX rack now has a patchbay to route to the synth rack and an improved power switch.  The synth rack now has a new entry as well.  So now it’s time to update the 2024 studio purchase log.

The Kurzweil Money Pit

A little over a year ago, my purchasing of keyboards for the studio was peaking, and I was grabbing whatever struck my fancy.  One of the things that came along at that time was a Kurzweil PC3.  It "had problems".  Professional diagnosis said that the main board was bad and would need swapped out.  So I left the device in my rack and waited for another PC3 to come along that needed repair so I could merge the two into one working device.

And it took over a year for something to appear.  This one was the PC3x, which is the 88 key version of the model I had – the 76-key version.  The description, along with demo video, said and showed that the display did not work.  And that was ok with me, because I had a display that did  work.  The asking price was $450, which is a little more than the $300 I paid for the first one, but if these things only appear once a year, I guess I have to get it and go.

I arranged to pick up the device the next day and explained I didn’t care about the screen, but I wanted to know if it had sound.  Time moved slowly and eventually, the seller said they couldn’t confirm if it had sound or not because the display problem prevented any testing.  Well, ok.  I’ll still take it.

And I really overpaid.  I didn’t get what they were saying if I wanted it, just come and get it.  And when I tried to pay them the $450, they were like, no, no, we don’t know if it works or not.  They wanted to give it to me for free.  I drove a hard bargain and gave them $300 instead.  Hindsight is painful, but I’m still ok.

First thing this morning, I started it up.  Initial diagnosis, the screen works.  There’s no backlight.  However, the device is stuck in a rebooting loop.  That’s the repetitive clicking the seller was hearing.  Later in the morning, I have it all disassembled and am running the built-in diagnostics.  The device spontaneously reboots when testing the RAM, but all other tests pass.  Audio can’t be tested because it relies on the RAM, so it reboots on that test as well. 

Ok, so let’s get device #1 and see what we can transplant.  I disassemble the 76-key version and take out the screen.  I figure it will be at least easier if I can see what I’m looking at while testing.  The backlight for the screen is hard-soldered to the main board.  Ugh.  I desolder both, then solder the working screen into the new 88-key.  I go to plug the display board to the main board and… fuck.  The ribbon cable is too short.  Because, duh, a 76-key board is not near as long as an 88-key.

Ok.  Plan B.  Let’s replace the backlight.  I disassemble the display and am very nervous because there’s like no wires to the screen.  It’s some kind of conductive rubber sheet that connects the circuit board to the glass screen.  Then I find out that there’s no EL sheet there – it’s just a big white box with two wires going into it.  I don’t know what that is or how it’s getting lit.  So I go drastic and cut the leads to the existing light and solder them up to an EL sheet I have.  I have to make significant modifications to the metal frame to accommodate the placement of the wires.  Lots of dremel work and hot metal.  This is spiraling out of control.  I get it all put back together, enough to fire it up and… no light.  That was a damn waste. 

Let’s step back a little bit and do some isolated testing.  I take the 76-key display and wire up the power with some extension wires.  I power up the board and the backlight comes on for a brief moment, then goes out.  Hmmm.  Maybe my old display is flaky too?  Or is it possibly a problem with power delivery?

I go back online and do more searches for replacement displays.  Like everything else PC3, there are NO replacement parts available anywhere.  But I found a post of someone who had fixed their backlight and actually provided pictures.  And the replies had even more good info.  Using this info, I bravely cracked open the box on the display board to find the light inside.  It’s not LED, it’s actually florescent (compact florescent or CFL).  Weird, but you know, a lot of computer monitors used CFL for backlight before LED became cheap enough.

I had cut the leads completely off, so I resoldered the leads back, then soldered that disassembled display to the 88-key board.  When I turned it on, I could immediately see that the bulb was only about a third lit and what was lit was extremely dim.  And like their full-size counterparts, this bulb had the telltale signs of age with the darkened ends.  This is replaceable.  And if I hadn’t found that post and the replies, I would have been simply stuck again.

A site called CFL Warehouse, stocks these bulbs, and they’re not expensive, like $11 each.  And shipping is obscenely cheap, like $2.  So I bought two.  Maybe I’ll fuck one up, and if I don’t, I can replace the bulb in the other display too.  And when parting out the remnants, that should be a decent selling point.

So for now, I’m waiting on parts, like I’m waiting on parts for two other devices sitting around.  And once that’s done, will I be able to go to the next step of swapping components or will both devices have different failures on the same board, making it all pointless?  That remains to be seen.

Studio Buying Spree Continues

It’s a new year and Brainfield studios shows little sign of letting off the GAS (Gear Acquisition Syndrome).  I filled up my rack and had 1U of space left and figured I’d add an effect unit, because why not?  And then, why stop at one?

I’d been mulling it around and never really saw anything that caught my eye until one day in mid-February at a pawn shop, I saw a Lexicon Alex for some ridiculously low price like $30.  So I snapped it up and my journey began.  No surprise, the pots were absolute garbage, blasting noise on the slightest adjustments, but a soaking of Deoxit D5 cleaned them all up.  I’m willing to bet 80% of people don’t even know about this cleaner and think when the pots get scratchy, they just have to pitch the thing.  God knows, I was that ignorant not so long ago.

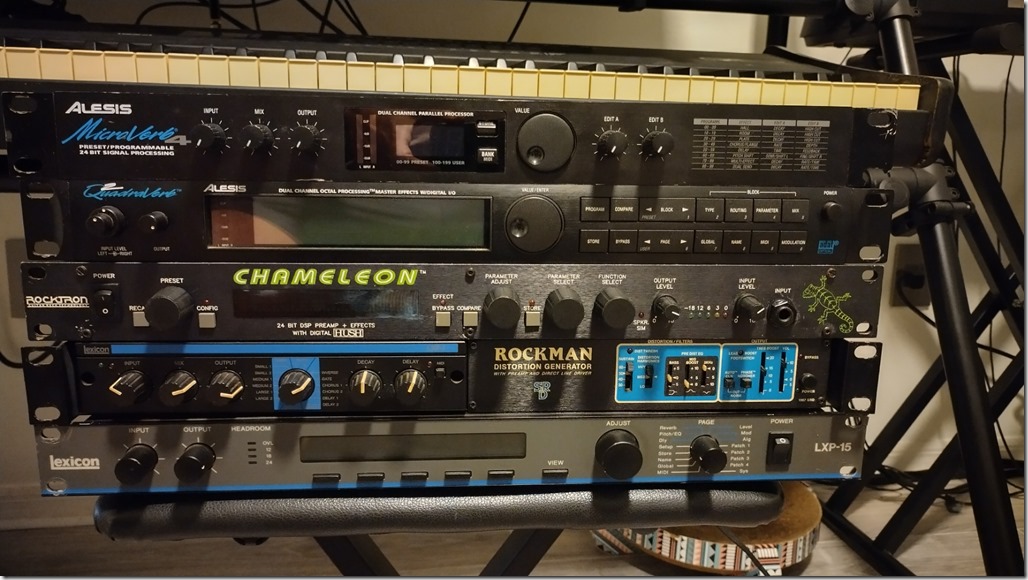
Unit 1 acquired.  But that fills up my rack, so now what?  Well, as a future post will explain, you build a second rack.  But for now, it’s time to build up the inventory for this new rack.  Checking the usual places of Ebay, Craigslist, and FB Marketplace, I landed a couple of buys from FB marketplace in March.  One was a beat up, rusted guitar effect unit, the Rockton Chameleon, and the other seller had a Digitech DSP 128+ and Alesis Microverb.

The Chameleon, like the others, needed the pots cleaned, and for this device, I did a refinish of the case, which turned out quite well.  Otherwise the unit is great and sounds awesome.  The other two devices from the other seller, well…  The Digitech doesn’t work.  It has no wet signal, only dry.  I’ve submitted that to my usual repair shop for repair, because I can’t bear to take a loss on it.  I’d rather pay more for a working unit.  The Microverb works fine, but one of the buttons was superglued back into place and when I pushed it for the first time it just snapped off.  Quite annoying, but it doesn’t affect the usability of the device – just looks crappy.  So one fair seller and one less fair.  It left a sour taste in my mouth about buying for a little while.

But hope springs eternal.  Today, still in March, I went to purchase a Lexicon unit and walked away with a jackpot.  So this guy works at a thrift shop and the staff there don’t know anything about electronics and don’t really want to deal with them, so they just…  give everything to him.  And recently, someone came by and donated two shopping carts full of studio gear.  He took it all and now he’s refurbing it and selling it.  So, it’s a situation that kind of really pisses me off, but here I am anyway and can I get something out of it.  Well, the Lexicon is great, but in this pile of other gear, I see another Alesis unit and a rack shelf with another unit and a Rockman Distortion Generator mounted in it.  OMG.

I try to stay cool about it and casually say I’d be interested in these other devices if you want to bundle them.  He asks how much they would be and I calmly say, "oh, $80-$100 each, probably".  He says he hasn’t tested them yet, so maybe $60 each?  Absolutely.  I came ready to buy one unit for $80 and I’m leaving with 4 units for $200?  And ok, that Rockman is selling online for $500 right now.  Not that I’m a flipper, but I really enjoy getting a good deal.

They’ve all been tested out and all work.  All will need major cleaning and liberal applications of Deoxit, like every other device I’ve ever purchased, but this is a great jumpstart to my upcoming effects rack.  In fact, when you add in the power strip and the patchbay, there’s only 3U left available.  That went fast.

To summarize the devices and their values so far:

  1. Lexicon Alex ($100)
  2. Lexicon LXP-15 ($300)
  3. Lexicon LXP-1 ($200)
  4. Rocktron Chameleon ($150)
  5. SRD Rockman Distortion Generator ($500)
  6. Alesis Microverb 4 ($150)
  7. Alesis Quadraverb 2 ($250)
  8. Digitech DSP 128+ (pro repair unrealistic.  Waiting on parts for self-repair attempt) ($100)

IMG_20240320_202707_HDR

In March, 2024, I found a listing on EBay for a Korg Poly 800 II.  The listing said some keys didn’t work.  That sounded like something I could repair so I made the purchase.  It had no problems and only needed a new battery.  *shrug* 

In April, I had been trying out the Kawai K1m that I had and was surprised that it sounded better than I first thought.  I had the idea that I could buy a K1r (the rackmount version) and sell the K1m (the tabletop version) to recoup that purchase and I could save space, too.  I made an offer on an as-is listing that said three times, "will not power on".  Got it and the listing was accurate.  It just needed a new fuse.  *shrug*

Shortly after that a listing for an Alesis Nanosynth came up.  Once again, has problems.  The seller was only asking $75 for it, so I put it in my favorites.  He sent an offer for $60, which I accepted.  IDK if I can fix this one, so it may not end up in the final list.  And finally, I got a second Kurweil PC3 and I’m attempting to merge the two broken devices into one working device.  It’s a journey.

2024 Hike Log

Last year’s hike log was a modest success, at least in that it kept track of each of my hikes.  So let’s do it again for 2024.

Date Location Distance Notes
1/13/2024 Green Swamp 4.3 mi
1/27/2024 Blackwater Creek 4.3 mi

…In The Way That Best Works For You

In my many years, I’ve had brushes with that hobby called fitness.  Somewhere in here is my short-lived attempt at appreciating CrossFit, which ended in puke.  I also have many instances of hiking, which is probably the most consistent of all my exercise methods.  I used to love to bicycle and in my later years when I would purchase a bike (happened a few times), the spark never caught, so it went nowhere.  I’ve owned and gotten rid of weights before like probably many people have.  But the one thing that has eluded me is enjoyment and consistent application of aerobic activity.  I know aerobics is important to building stamina, something I desperately need; something I’ve always needed.  But every means of getting it was not resonating with me.

Probably about 15+ years ago a product came into popularity that did pique my interest.  It was the rebounder, a durable mini-trampoline.  All the claims seemed to make sense to me, so I made the purchase and started a routine.  It didn’t last and the device went into storage.  Recently, I pulled the same rebounder out of the garage, dusted it off and started again after 15+ years of not using it.  My experiences then and now have been parallel, so I only need to explain this once.

Rebounding can be easy and it can be extremely hard.  The workouts that came with my device fooled me each time I’ve tried to make progress.  I’m going to try and be more motivated this time since there’s more at stake, even though the required effort is going to be much higher since I no longer have youth on my side.

To explain the rebounding activity, there’s two ways to do it, the easy way and the "real" way.  The easy way, which is the version you do in the first timers workout, you can just use the weight of your body and bounce on the rebounder.  Maybe you have to push a little bit with your legs to get back up again, but the telling part is that your butt is going up and down as you bounce.  That’s actually not the way you should be doing it, but because of the tempo of the workout, it is easy to do.  The first timers workout is under 15 minutes and I’ll be honest, it took me about a week or so to build enough stamina to get through it.  It was humbling.

I made a deal with myself that I wouldn’t settle for just staying on the first timers workout, but I knew what was waiting for me when I would advance to the beginners workout, since I’d been through it before and the memory was painful.  As memory serves, I eventually did get through the beginner workout and even added the abdominal workout afterward before I burnt out.  But, baby steps first.  The tempo of the first timers workout is at 100 bpm, like I say, it’s enough to just bounce on the device.  The beginner’s workout starts at 120 bpm for the warmup and then hops up to 126 bpm.  At this tempo, and absolutely at 126, you cannot fall fast enough to simply bounce and you are forced into rebounding the correct way.

To do it the correct way, you are essentially levitating.  Your butt is in near the same position the whole time and your legs are pistoning down into the rebounder.  It’s hard.  It’s really fucking hard to keep that tempo and not get winded.  But that’s what stamina building is all about.  So like I said, I finally made it through the first timers after days of trying to get to that level and now I hit another wall.  So far, I can get 7 minutes into the 30 minute beginners workout.  That the full warmup at 120 bpm and maybe 2 minutes at 126 bpm.

One more thing about rebounding at any level.  If you have a gut, which I’ve developed over many years, you’re going to notice some quick improvements.  Bouncing up and down is pretty crappy when you have a gut and you will instinctively clench your abs to prevent any flopping.  It’s also thrown out as reminders and encouragement during the workout to "engage your abs".  So what you get is sort of a mini-plank throughout your whole workout.  And it works, really fast.  My pants started fitting better in a very short time and I definitely have less floppiness and protrusion, so +1 for that benefit.

Now, on the topic of masculinity and rebounding, I’ve grown up through very weird times.  Aerobics was a craze in the 70’s.  And while you would see men participating in aerobics with outfits that were not very manly, those men were kind of mocked behind the scenes.  Real men worked out like Arnold Swartzenbanger and did feats of strength, not endurance.  But regardless, the aerobics men were fit and often really ripped.  They probably did weights as well, but were still stigmatized by working out with women in leg warmers.  While gay culture was growing in the 70’s and 80’s, it was still not accepted and men had to be careful how they presented themselves to avoid being accused of that.  (And it seems we had made so much progress and are quickly losing it again.)

I work remotely and my work computer is in my living room, which is also where I do my workouts.  Usually, I clean up everything before work starts, but one day, I did not put the rebounder away and it was visible in the background during a team meeting.  I got called out on it.  That stung just a little bit.  But my reflection on that feeling is pretty much is driving this post.  It doesn’t matter how you are getting your fitness, all the roads lead to the same destination.  If you are doing something you don’t enjoy, you’re not going to stick with it.  So I encourage you to try anything and everything until you find the method you like.

Plex Randomized Playlists

So I had this idea for a while.  It was sort of the first step to a bigger idea for Plex.  But this first step was pretty simple.  I wanted an option for playlists to always play randomly.  It could be a checkbox in the playlist options to always play in random order.  i didn’t think it would be too difficult to implement for the devs, since the playlist items get copied to a play queue table before starting and it should just be adding a randomizer in there to insert the items in the queue randomly.

So I went to Plex’s forum and started to write a a feature request.  Turns out it had been asked before, and that request was closed without being implemented.  In the original request, someone had put a tip for how to create a randomized playlist.  The steps were to basically create a smart playlist using a Filter, then change the sort order to an undocumented option, "random" before saving the filter as a smart playlist.

Ok, so that works, I suppose.  The only problem is the criteria for building a smart playlist is pretty limited.  It would be nice if there were options like "tracks in playlist X", but no.  The only real field that’s at the track level to freely use is "track mood", which is a collection of tags.  So I guess that’s what I have to work with.

To support this, I’m creating moods essentially mimicking playlist names.  Giving each a common prefix, I have "PL-70’s Rock", "PL-80’s Rock", "PL-80’s Pop", etc.  The downside, which is painful as fuck, is that I have to basically rebuild every playlist from scratch, or go through every track in my collection and tag each file with the appropriate mood.  So far, I’ve put in 3 hours and made it to the "D" artists.  There’s 2300+ albums to go through.  Granted a lot of them won’t even be touched, like classical and compilations, but it’s still a massive undertaking.

I’m just looking forward to when it’s complete and I only have to tag songs as I add new CDs to the collection.  This weekend is going to be crappy weather, so I’ll have plenty of inside time to work on this.

The Road To Nowhere

“Ok, I think I’m just about done with the music studio.” – Anachostic, a couple months ago.

So that was a lie.  Let’s quickly summarize events in the studio since my last satisfaction point.

  • Became dissatisfied with power routing and decided to make alterations
  • Retrofitted new power jacks onto four devices to support standard cabling of varying lengths
  • Modified hardwired devices to have a pigtail power jack supporting  standard cabling of varying lengths
  • Purchased more cables: shorter power cables, longer power cables, longer audio cables, RCA to 1/4” cables.
  • Bought a better rack mixer, which gave me an extra available rack space
  • Added another rackmount synth
  • Modified the routing of a couple synths in the rack to go through the patch bay, giving me more rack space
  • Ditched my mini desktop keyboard for one with full-size keys
  • Decided to make a battery swap on a device known for having a non-standard battery that leaks
  • Discovered some new software that allows software control of hardware.
  • Replaced a backlight on an older device.
  • Ordered the stand for the larger devices (this was in the roadmap, so technically not a new project)
  • Finally got around to repairing a device sitting around.

That’s probably enough of a summary.  Here’s some of the details of the vague items.

The General Music Equinox has a Ni-Cad battery that is known to leak and cause damage.  Most all synths have lithium batteries, usually a 3v coin battery.  Not this one.  It’s a 4.8v rechargeable battery.  It’s literally not available anymore, so your only choice is a retrofit of something else.  I found a battery pack used by security lights that’s 4.8 volts, but I wanted to do it better than just a hard-wired fix, so I had some research to do.  The power pack had a plug on it that I learned is called a JST connector, and once I found the proper size, I ordered a cable so I could make a connectable power jack from the circuit board.  Because of course that battery will need changing in the future.

The new software is called Ctrlr, and it’s sort of a Sysex editor and librarian.  You can download control panels for a variety of synths and they will talk to the hardware and make the patch changes.  Amazingly, you can also host these panels in Cubase as VST instruments.  So you get the automation of a VST instrument out of your hardware device.  Fascinating.  Although it’s in a programming language I’ve never heard of, it’s intriguing enough that I might try my hand at creating some panels for synths that I have that aren’t represented yet.  I could convert Fexman into a panel for the MU80 and MU100.

At one point, I thought my rack was full.  I had everything wired to the rack mixer and was out of mounting space.  But then, I got really irritated at the noise level from the used mixer I had bought and decided to upgrade.  That gave me an extra 1U of space.  I thought maybe I could get an effects unit and wire it into the patch bay.  That made me think, the Yamaha MU80 and MU100 can be used as effects devices, why don’t I wire them into the patch bay?  And that freed up more rack mixer inputs and more mounting space.  I found a new synth to fill in 1U space: The Korg TR Rack, which is the Korg Trinity in rack form.  The later version, the Korg Triton, is a 2U box and also has sampling ability.  As the synths get newer, I get less interested.  The Trinity is more of a pure synth and as such, suits me better.

And speaking of newer devices, one of the newest that I own, the Roland Juno Di, hasn’t worked since day 1 of purchase.  Granted, I bought it knowing it was non-functional, and although I tried to troubleshoot it, it was far beyond my skill.  I had a shop in Orlando that said they could fix it if Roland would ever make the parts available.  Tired of waiting, I contacted an authorized Roland repair center and I got word that it is fixable and for $250, it would be fixed that day.  The problem was a bad mute line, which I have seen other techs repair in videos, but it involves schematic reading and skilled use of an oscilloscope, both of which I have no experience in.  So it’ll be nice adding that device to my collection.

The new stand comes tomorrow and it’ll hold four devices.  And you know what, it’s not enough.  I have more.  But I do have the 2-tier stand I can use and a couple keyboards don’t have to come out of storage, so it’ll all be ok.  I think.  I’m pushing the limits of my MIDI ports.  So that will be six keyboards on the north wall, six on the south wall, and eight in the rack.  A nice, round number, 20.  And then the two in storage still.

So awesome.  You got a shit-ton of gear.  What are you going to do with it?  Like, maybe, make some music?  I haven’t been ignoring that, really.  I have plenty of ideas jotted down that I can flesh out.  The problem is these new technologies I come across.  Ctrlr is a totally new frontier and I could lose a lot of time just learning and exploring and creating in it.  I ditched the Tuna mini controller and got an Oxygen 25.  That cost me time figuring out how to configure the Oxygen to automate Cubase.

Then there’s the problem of so many sounds.  That’s actually one of the reasons I got out of using VSTs is that there were so many sounds it was overwhelming.  And here I am, in the hardware realm, with the same problem.  I’m thinking I’m going to have to start a notebook and write down devices and patch names and song ideas while I’m browsing sounds.  Many times, I’ll find a nice sound, some up with an idea that utilizes its special elements, then move on to the next sound.  sometime, I’ll record the idea, and I have plenty of them to go back to.  But sometimes, I just hear a sound that’s like “I know what I would use that for” and when the time comes when I need it, god forbid I’d ever find it again.

So there you go, all caught up on the drama for another month.

Spaghetti Is Bad For You

Brainfield studio is down at the moment for renovations.  This is the big push to bring everything online and together, and it’s led me to realize some things that will pain me for a bit.

First, I have a lot of gear.  And up until this point, I had been using it piecemeal and never really had to worry much about connections.  To accommodate it all, I need a lot more connections.  That means lots of wires.  Lots of them.

So to sort of map it all out, the final design will have a 6-keyboard stand, a 4-keyboard stand, and a 2-keyboard stand.  Then there is the rack and mixer, and the monitors.  All of the rackmount devices can be considered one unit as they have a submixer.  So that’s 13 stereo inputs, or 26 channels.  I have a 16 channel mixer.  How will I reconcile that?  Time to level up the studio with a patchbay.

The patchbay sits between connections and lets you override any at will.  So I can have my usual favorite devices connected and if I need to hear a different device, I can patch its output in the patchbay to a free input on the mixer.  It takes a little bit to wrap your head around, but I’m getting to the point that I can’t imagine not doing it this way.  The alternative is having a bunch of cable ends laying on the floor around the mixer and I have to figure out which one I need, unplug something from the mixer and then plug in what I want. It’s also a lot of wear and tear on the mixer ports.

So that sounds lovely, but now, consider what I said, the patchbay sits between every connection.  So while you used to have a connection between the device and the mixer, now you have a connection from the device to the patchbay, and another from the mixer to the patchbay.  That’s more wires.  With my 16 channel mixer, that’s going to be 8 stereo cables, plus the monitor outs.  Because the monitors connect to the patch bay and the mixer outputs connect to the patchbay.  Everything connects to the patchbay.

I have options in which patchbay I choose.  I decided to bite the bullet and buy one that uses TRS (tip ring sleeve), which is functionally equivalent to a stereo jack.  Biting that bullet means that all of my existing mono cables are worthless.  Well, I can still use a mono cable I suppose, but I will be running each port as stereo and I’ll need to buy new TRS to dual mono cables.  That’s going to be pricey.  And on top of those, I also have to buy TRS cables to do the patching on the patchbay.

So there’s that.  That’s the first point.  The second point is:  I have a lot of gear.  It’s not only audio signals I have to concern myself with, it’s also MIDI control.  So I’ll have a few input devices and whole lot of controlled devices.  I have just maxed out my MIDI interface hardware, so I have 9 in and 9 out ports, which is far more than I probably need.  Why so many ports?  Because some devices can be multitimbral and can listen on all 16 channels so they need their own dedicated port.  Monotimbral devices can share a port and each use a unique channel number.  And to accomplish that, I’ll be using MIDI thru boxes to split the signal.  That means I don’t have to have all the devices on for the signal to pass through each one.

But you know what that means, more cables!  And with the added devices spread around the room, I need more cables and longer cables.  So I made up a rough list of what I need to buy to connect everything together.

Audio Cables (TRS to dual 1/4”, aka Insert cable):

  • 3’ – 8
  • 15’– 11

Audio Cables (TRS-TRS)

  • 25’ – 2

TRS Y adapters – 2

TRS Patchbay cables – 6

MIDI Cables

  • 6’ – 1
  • 15’ – 4
  • 25’ – 4

I placed an order with MonoPrice and Amazon to get everything but the 6’ and 25’ MIDI cables.  I have other MIDI cables already and I have some F-F adaptors that can extend a couple cables.  I think that’s going to put me closer to the goal.  If not, I’m just wasting money, but what else is new?

Random Story Time–Pizza Voyeur

This story takes place in the early ‘90’s.  I was working at my first employer, a local pizza place.  I didn’t really have any experience of how work “worked”, and was just learning and growing, as young workers do.

So anyways, one day I come in to work and the I’m immediately stopped by one of the managers.  He’s angry AF.  I hadn’t done anything wrong, I was on time for work, and so the whole thing just caught me off guard.  My memory of the incident is a little hazy, but I want to say the other manager was behind him and she had not an angry expression, but had a really concerned look on her face. 

We’re still in the entranceway of the employee entrance and I don’t see anyone else in the store right then.  The manager orders me in a stern tone, “Show me your shoes.”  What?  I don’t think I actually responded but probably had an extremely confused look on my face.  He ordered me again, “Lift up your foot, show me your shoes.”  I don’t even think this second order sunk in.  It just sounded like a joke.  Maybe I laughed.  I’m just wearing black sneakers.  I just came in, so it’s not like I tracked shit around the store or anything.

Again, “I’m being serious. Show me the bottom of your shoe.”  And with complete confusion, I complied.  He looked closely at my shoes and with a somewhat relieved tone, said, “ok.”  He and the other manager went back to the office and I was left completely baffled.

And now, the rest of the story.

It turns out that a discovery was made in the back storage room.  Some bags of flour had been stacked up and apparently some shoe prints were found on the bags.  They were trying to find out whose shoes had a matching pattern.  The reason for this witch hunt was not any health or safety violation.  The bags were stacked up against the side wall of the bathroom, and the elevated position provided a viewing spot through a small crack near the top of the wall.

Yup, there was a voyeur in our ranks.  While my memory of the female manager is a little spotty, I clearly remember that at the time we had recently hired two other females to work phones and register during busy nights.  Otherwise, the place was all dudes.

It didn’t occur to me then, but looking back at it now, I wonder if I should be offended that I was accosted that strongly.  Was I that much of a suspect?  Or maybe everyone was treated like that?  I have no idea.  But, after the full story came out, there was one person that was the first suspect in everyone’s mind:  Bruce.

Bruce was the son of Jack.  Both Bruce and Jack worked at the store as delivery drivers.  Bruce was about as awkward and different as you would expect a peeping tom to be.  For what it’s worth, Jack was a Baptist minister in the town, so no telling what kind of upbringing Bruce had.  Although he was only the prime suspect in everyone’s mind, Bruce never worked there another day after that event.  An official ruling was never made.  The rumor was that his dad called him and told him not to come in, which is pretty outrageous, but nowadays, seems like it would be just normal.

And it was never discussed again.

Where From Here?

After updating my studio buying log for the last couple months, I thought I should take a moment and reflect on the journey so far and what the road ahead looks like.

The good news: I have not lost interest in the reconstruction effort for the old tracks.  Even though I’ve been working on them on and off for months now.  And the progress is fairly steady as well.  So far 29 tracks have been reconstructed, which I think is amazing.  There’s only maybe 8 left to do and of those, maybe 3 may have lost data or sounds that are impossible to source or recreate.  The progress is substantial enough that I purchased the device needed for yet a different recording from the era, done on gear not in the original studio.  Gear that was cutting-edge at the time but now is cheaply available.

And that’s sort of the roadmap for this month and next month.  This month is sort of paused on spending since homeowner’s insurance was due and it just feels prudent to keep my expenses level month to month.  But, there is a plan for the next phase.

The next phase obviously is new creations.  I’ve got a massive selection of new devices to work with now and there should be no wanting for any sounds for inspiration.  In order to make that next phase happen, I need to get all those dives out of the closet and set up for play.  That means I need a rack, maybe multiple racks.  There are ten keyboards in the closet right now.  I have my eye on a rack that will hold six of them, which might just be fine.

As far as repairing devices, I’ve done alright.  Most devices that I take in only need little changes.  Like the U220 on the table right now.  It had a completely dead battery and the power button got stuck in when I power it on.  After disassembling it, the plate that held the MIDI message light, which was also the frame for the power switch had become detached.  Just needed superglued back into place.  I think someone though the MIDI message light was a button and pushed it so hard it detached it from the frame.  The Kurzweil was a mystery that I returned to a couple of times and by random chance I seemed to have fixed it by changing the default startup patch.  My suspicion is whatever the previous default patch was had some bad configuration data in it and when it was loading that faulty patch, it caused the sound output settings to get botched.  The wonder of fully software-driven devices.  My Alesis QS8 started exhibiting audio problems after it warms up, so it’s relegated to a MIDI controller right now.  And the faders are still nasty, spewing garbage on the MIDI channel, so its time may be short altogether.

So in summary, the travel has been smooth and the road ahead looks clear and bright.  Barring any unexpected events, the year is looking positive.