Category Archives: Informational - Page 2

Exact Audio Copy Secure Ripping And Image Files

I made a brief comment on this technique in a previous post, but I’m going to expand on it a little more because I tried a practical test of the technique and the results initially seemed valid.

Ok, so you are using Exact Audio Copy to rip your CDs, and you want to make sure they are good rips, but sometimes, you get “Read Error” and even worse, “Sync Error”.  This means you have a problem reading your CDs.  But you look at your CD and it’s pristine.  What’s the problem?

I had this happen on a few CDs and I thought, what if I copied the CD to a binary file, mounted the binary file as a virtual drive, then ripped it from there?  Well, guess what?  That works!  But the skeptic in me wondered why the disc would read as data, but wouldn’t read as audio data.  It’s still reading the bits off the disc, why would one fail and the other didn’t?

So, I needed to prove to myself that a imaged CD was a bit-for-bit copy of the original.  To do this, I decided to rip some imaged CDs with AccurateRip enabled.  AccurateRip creates a checksum from the read data.  The checksum would then be compared against a large database of other known good rips and it would confirm that the results were the same.

So, I chose four CDs from AccurateRip’s Key Disc list and imaged them to files.  I used Daemon Tools Lite for the imaging.  (If you’re going to do this, go to oldversion.com and get an older version of Daemon Tools that doesn’t have the imaging feature removed.  I used v4.45.4 and disabled updates.)  I imaged the discs at 24x speed to lower the chance of read errors. The file format I used was MDX.  ISO would not cut it.  Then I mounted each disc using Daemon Tools to a virtual drive and used Exact Audio Copy to rip the images to WAV.  There is no need to rip to a compressed file because the checksum is calculated from the uncompressed data.

Part of the ripping process in Exact Audio Copy was configuring AccurateRip.  I had to provide three Key Discs for it to properly set the offset for my (virtual) CD drive.  I had four Key Discs, so I was well set.  Ripping from a virtual drive is pretty impressive.  It rips on my computer at 50x, faster than the theoretical 48x max my CD-ROM would do.

Disc 1 results: 8/10 tracks accurately ripped
Disc 2 results: 10/10 tracks accurately ripped
Disc 3 results: 3/9 tracks accurately ripped
Disc 4 results: 5/10 tracks accurately ripped

Not the results I expected.  However, it was curious that discs 1 and 2 were newer discs and 3 and 4 were older discs.  So I grabbed four more CDs, two new, two old, and tried again.

Disc 5 (old): 8/9 accurately ripped
Disc 6 (old): 0/10 accurately ripped
Disc 7 (new): 10/11 accurately ripped
Disc 8 (new): 1/12 accurately ripped

So, that doesn’t help anything, or at least doesn’t prove my hypothesis is correct.  So, let’s rip the physical media and compare it to the virtual rips.  We’ll do discs 5-8 since they’re in front of me.

Disc 5: Virtual 8/9, Physical 9/9.  The tracks that were accurately ripped between the two had the same checksums.

Disc 6: Virtual 0/10, Physical 0/10.  All tracks had matching checksums, just no matching AccurateRip entry.

Disc 7: Virtual 10/11, Physical 11/11.  Same checksums on all successful tracks.

Disc 8: Virtual 1/12, Physical 12/12.  The one successful track matched on checksum.

So what’s the takeaway from this?  It would appear that imaging a CD to a file is the equivalent of ripping a CD in “Burst mode” (as termed by Exact Audio Copy).  This means you may or may not get the exact bytes.  But, when ripping in Burst mode, AccurateRip is not available.  Doing the rip from an image file can get you AccurateRip results for some of the files and will flag others as not accurate.  This way you sort of get the best of both worlds.

But, what you lose is the re-reading attempts that Exact Audio Copy performs in “Secure mode”.  And in those cases, you may be able to salvage a track that might read poorly in Burst mode or through imaging.  Remember, in burst mode, you get one try at reading the data (with error correction).

The important takeaway for me is that imaging a CD makes no improvement.  It’s not going to make the CD any better.  My new plan will be to use Secure mode to rip all the possible tracks, skipping tracks with Read errors, then re-rip the skipped tracks with Burst mode.  That’s the same result as ripping an imaged CD with Secure mode.

Such Innovation

Google’s at it again.  They’ve added a feature to GMail to allow you to recall an email before it’s been sent.  But really, it’s not recalling the email, all Google is doing is holding the delivery of the email for a pre-determined timeframe.  The time of your potential regret.

I’m not a fan of webmail, never have been.  It’s related to my distrust of the cloud, but also, it also means limited functionality.  This delayed mail feature has existed forever in desktop mail applications.  You see, back when the Internet was an expensive option, people didn’t stay connected all the time.  Users were limited in minutes or they had to call long distance, or they had to use their phones for talking to people.

Email applications operated as such:  you would connect to your internet provider, download all your mail, disconnect, read and reply to all your email, then reconnect and send your replies.  So all email applications provided a way to store your emails in an Outbox for later sending.  You can use this functionality to save yourself from sender’s regret.

To enable the Outbox queue in Windows Live mail, go to Options>Send and uncheck “Send messages immediately”

image

In Outlook, the option is under Options>Advanced>Send and Receive

image

I didn’t see any way to accomplish this using the Mail app in Windows 8.1 or Windows 10.  Progress!

So, if you defer your messages in the Outbox, when do they get sent and how do you control when they get sent?  In Windows Live Mail, this is defined in Options>General.  Your Outbox messages will be sent when new messages are checked (10 minutes in this case).  Uncheck that option to make WLM wait until you click Send/Receive to explicitly send your messages.

image

Outlook gives you much more control over when and how messages get sent.  This is under the Send/Receive Groups, which is accessed by clicking the Send/Receive button shown in the last screenshot.

image

Things haven’t always gotten better, and new features aren’t always new and groundbreaking.

My Level Of Security

I’ll admit, I get around on the web.  I go places that you shouldn’t go.  But for the activity that I do, I’m pretty safe.  There’s only a few precautions I take and I don’t think it’s all that difficult for anyone else to do.

First and foremost, I installed the MVP Hosts file.  This file does a system-level blocking of any network application that tries to access an internet address that is considered advertising or malware.  This makes nearly everything better, because websites don’t get bogged down with ads.  There are some times that I do need to disable it, but those times are few and far between.  Because it’s system-level, that means IE, Chrome, Firefox, or any other application is immediately protected.

If you go looking for it, there is a growing argument that ads should not be blocked on websites, especially legitimate content sites.  I disagree.  I recently read an article on the analysis of the spread of an unpatched vulnerability.  The malware authors used a legitimate ad service that was utilized by many legitimate websites.  This means that there is no ad service that can be fully trusted.  My position is, if you want to display ads, you host them on your domain and you will take full responsibility for their content.  And because the ads are on the same domain as the content, I can’t and won’t block them.  Even if the ads aren’t malicious, legitimate ad services still serve up misleading ads, designed to trick you into clicking them.  They make them look like authentic messages or toolbars or status bars.  That’s not advertising, that’s flat-out deception.

Back to my security.  Next, I block Flash, Java, and all other plugins by default on all websites.  I used to do this in IE by changing the Flash plugin from blacklist to whitelist, but have come to prefer the ActiveX Filtering feature.

And I’m sure certain people would be screaming “You’re using the most insecure web browser evar!”  I would respond with a hearty rolling of the eyes.  Of the three precautions I take, this is the only one I perform at the browser level and without ActiveX, the majority of exploits are defeated.  That leaves JavaScript exploits.  How are these exploits delivered?  Through ads.  Ads that are blocked by the MVP Hosts file.

So, what’s the last piece of defensive software I use?  Microsoft’s EMET utility, which blocks vulnerabilities at the code level.  This is a really low-level utility and is not exactly user friendly, so I pretty much just run it at the default level.  It’s hard to tell if EMET is working because it’s so low-level.  I’ve seen it do its job twice.  Once, when I was using a Java applet on Verizon’s pages to play my voicemail and another on a sketchy website where it looked like the website was trying to perform an SVG image exploit.  I admitted already, I go to bad places sometimes.

Because I take these precautions, I hadn’t thought about being attacked in quite a while.  On a whim, I ran MalwareBytes and it came back with zero results.  My database was over 2 months old, if I saw correctly.

The only thing that I am vulnerable to is downloading Trojans and installing them myself.  And that is simply a personal fault – no fault of my computer or software. I will comment that downloading software from websites has really become a minefield, with sites displaying many different “Download” buttons at once.  You have to study the page and find the correct context for each button to make sure you are choosing the right one.

In summary, I feel I’m doing pretty good with the tools that are made available: KeePass, VeraCrypt (the replacement for TrueCrypt), MVP Hosts, EMET, and IE’s ActiveX filtering.  I use two-factor authentication whenever it’s available.  It’s not something I did all at once.  I added each little piece as I went.  And in total, it doesn’t slow me down at all.

Upon Death

There’s a lot of people who are a little or maybe more than a little disturbed by my acceptance of death.  It’s just not a fear of mine and I have no issue with its eventuality.  I’m not even going to try and avoid it.

With such a straightforward view of death, it would make sense that I approach it in a straightforward way.  Everyone keeps harping on the point that you have to have a will.  Yes you should have a will if you own any significant possessions, and of course I do have one.  But there’s another document you need and I imagine many people don’t think of this.  It’s the “Upon Death” document.

Quite simply, this document explains what needs to be done after you die.  It’s like a corporate succession plan.  It can be the document that makes your departure much easier to bear for everyone left.  Think about it, aside from the feeling of loss of your company, what’s the biggest worry people are going to have?  They’re going to worry that they don’t know anything about you and don’t know where to begin to fill your shoes.

The Upon Death document needs to clearly spell out a few things to get people up and going.

  • Your mobile phone PIN and all your passwords
  • All your financial accounts/insurance policies
  • Where to find more documentation
  • Non-family members (business clients) that need contacted
  • How to do things that you did exclusively

Passwords

If you’re doing it right and you are using a password manager, this one is easy.  Just give the master password to your password manager file.  Otherwise, you are going to need to list out all the username and passwords for the sites you visit.  At a minimum, you’ll need to provide your email account password so your successor can reset passwords on other accounts and access your email to complete the process.  Also, don’t leave out your phone PIN, if you use one, and your username and password to your computers.

Financials

Again, if you’re doing it right and you use a Personal Finance Manager (PFM) like Quicken or Money, you just direct people to that file.  It should have all your account numbers in it, ideally with contact information also.  Most PFMs don’t have good support for insurance policies, so include any policies in the document.  Don’t forget many banks have a small life insurance policy on their account holders, so check and see who has them and who to contact for them.  Your employer may have a life insurance policy as well.  Help your successor as much as possible here.

Contacts

If you have contacts outside your family, let your successor know what needs done now that you are gone.  Maybe you work for an organization and you have some of their property or equipment.  You need to get that back to them.  Maybe you are a consultant and you may have uncompleted work for them.  You need to get the latest work to them.  If there’s anything some needs to take over, your successor has to pass along that info.  You need to tell them what must be done and how it is to be done.

Training

This one is open-ended.  If there’s stuff you did that no one else knows about or you know some tips or secrets that need passed on, here’s where you do it.  Maybe the A/C unit freezes up and you’re the one that always fixes it.  That needs explained.  Maybe you manage the home network.  A basic overview can be of help here.  Maybe you can give suggestions as to who would be best to handle tasks in your absence.  Maybe one friend is good at mechanical issues and another is good at computers.

Finally, let someone know this document exists.  Keep it with your will.  If you have a safe deposit box, keep it in the envelope with your will.  Banks will let next of kin do a will search on a safe deposit box, where they can take the will out, but can’t get anything else until they can claim ownership of the account.

In summary, this document is filled with the things you would say from the afterlife if you saw your family and loved ones struggling to figure out everything that you did for them when you were there.  Everyone says, “I don’t want to be a burden” when they are living.  Few people think of how to avoid being a burden after they die.

Still Not Giving In

I’m still using MS Money.  And I’ve come across a couple of instances of it beginning to lose compatibility with modern systems.  So now, I’ve actually started creating workarounds for them.

I’ve used a variety of online accounts in my many years.  I’ve used HSBC, Capital One (the non-360 variant), Sallie Mae, and most recently, Ally.  At this point, I’ve decided Ally is getting all my business and I’ve been in the process of moving accounts into new Ally subaccounts, which is very easily done on their part.  Just today, I discovered the transaction download feature.  There’s no MS Money OFX option, but I don’t think Money existed anymore when Ally came on the scene.  Anyway, there is a Quicken download, so that is what I use.

MS Money is awesome in that it supports QFX files, however, the standard format of the file must have moved on in time, so now Money throws up when it tries to process the file.  After a bunch of trial and error, I discovered that the reason for the error is a node in each transaction entry for the check number: <CHECKNUM>0</CHECKNUM>. Once you strip that node out, the file imports just fine. 

In another case, my 401k provider, Transamerica, recently revamped their transaction download and their QFX files have a different problem.  The file headers look like:

OFXHEADER: 100
DATA: OFXSGML
VERSION: 102
SECURITY: NONE
ENCODING: USASCII
CHARSET: 1252
COMPRESSION: NONE
OLDFILEUID: NONE
NEWFILEUID: NONE

But there is a space after the colon, which causes MS Money to report the file is corrupt.  The header should look like:

OFXHEADER:100
DATA:OFXSGML
VERSION:102
SECURITY:NONE
ENCODING:USASCII
CHARSET:1252
COMPRESSION:NONE
OLDFILEUID:NONE
NEWFILEUID:NONE

So I made a script that will alter the QFX file and then launch the Money importer.  All you have to do is drag the QFX file onto the VBS file and you’re good to go.  If you want to get clever, you can put the script in your SendTo folder or map it as a default application.

Without further adieu, this is the content of the script:

dim fso,f,s,shell

set fso=CreateObject("scripting.filesystemobject")

set f=fso.OpenTextFile(WScript.Arguments(0),1)
s=f.ReadAll
f.close
set f=nothing

set f=fso.OpenTextFile(WScript.Arguments(0),2)
f.Write Replace(Replace(s,"<CHECKNUM>0</CHECKNUM>",""),": ",":")
f.Close
set f=nothing

set fso=nothing

Set shell = CreateObject("Shell.Application")
shell.ShellExecute "C:\Program Files (x86)\Microsoft Money Plus\MNYCoreFiles\mnyimprt.exe",  WScript.Arguments(0)
set shell=nothing

And then, you can import QFX files from Ally or Transamerica (and maybe some others that have the same problems) into MS Money without any errors.

In Recognition

There’s a job that is pretty well underrated in the modern age and it needs a little more promotion.  That job is: Lifeguard.  When you read that word, what’s the first image that came to mind?  A person sitting in a high chair beside a pool or on a high deck at the beach?  Just sitting there all day?  Maybe yelling at people every once in a while?  Sounds like an easy and/or boring job.  Anyone could do it, right?

If your lifeguard is not doing anything at your local swim area, be grateful.  That means you have a community that is educated in water skills and water safety.  But, there are many places where this is not the case.  In my area, where people come on vacation to go to the water, it’s painfully obvious that water skills don’t come naturally.  And that is why you need lifeguards.

A lifeguard is not just someone who likes to swim.  A lifeguard is not even just someone who can pull another person out of the water.  Lifeguard certification consists of many specific saving techniques – ones that EMTs and Paramedics might not even know.  There are precise ways to handle different emergency situations and skills that must be honed to perfection to avoid causing additional injury to a victim.  A lifeguard is an emergency first responder and is essentially an ambulance in the water.

There is another element of being a lifeguard that elevates them above EMTs. (You wouldn’t think this to be the case, but it is.)  When an ambulance is called and an EMT is sent to an accident scene, the damage is already done.  The EMT can only keep things from getting worse.  In the role of lifeguard, there is the opportunity to stop an accident from even happening in the first place.  Lifeguards are trained to identify signs of distress and trouble and can respond before anything bad happens.  Of course, this can be completely underappreciated, since the person being saved wasn’t in desperate need of assistance yet.

So the specialized skills of a lifeguard are beyond those of an EMT because an EMT is too late to the scene to help.  If that isn’t impressive enough, consider what “late” means to a lifeguard: 20 seconds.  Can you look out into a crowd of people, identify someone having problems and get to them in 20 seconds?  And if you think that any good swimmer could be a substitute for a certified lifeguard, consider some of these.

Could you save a a struggling person without being drowned yourself?  The victim isn’t trying to kill you and it’s nothing personal, it’s just self-preservation.  Could you save a person with an injury without causing further injury?  What if it was the neck?  What if it was the spine?  How long can you do CPR?  You don’t stop until the ambulance gets there.  How are you with heat?  You’re in the sun for a long time.

Lifeguards are not beach bums and they are not Baywatch.  They are trained professionals who save lives when needed and prevent bad situations from becoming disasters.  They will be the ones who are first on the scene for emergency assistance, whether for cuts, broken bones, jellyfish stings, choking or even drowning.  You may never see one in action, for which you should be grateful, but don’t discount the level of safety they provide.

I am almost always fascinated by trade magazines, because they illustrate how serious and passionate people are about their individual profession.  For example, at my first jobs working at pizza shops, the store would have a subscription to Pizza Today.  Yes, there was plenty going on in that industry, with techniques and technology to keep up on.  So, check out Aquatics Intl and get an appreciation of a lifeguard’s world.  They take it seriously and there is constant education and training happening there as well.

The One Minute Manager Synopsis

After reading the book, which was an extremely quick read, maybe half an hour, I figured I ‘d make a few quick notes to keep the ideas in my head.

The three main things the technique tries to instill are: 1-minute goal settings, 1-minute praisings, and 1-minute reprimands.  Obviously, the one minute thing isn’t literal, but it is all meant to be quick and not dragged out.

Some of the details of the story stuck with me, and some raised further questions.  For example, there is a lot of stress on the idea that a worker has clear goals and it is their job to do them.  If that worker doesn’t know how to accomplish a task, who do they turn to?  I thought it would be the manager, because the manager should know everything that is going on in the department.  But the manager doesn’t want to be doing the job of his workers, that is a drain on his efficiency.  There is the weekly meeting where everyone describes their current progress and roadblocks.  That may be where issues get raised and assignments made to resolve them.

Some things don’t sit all that well with me.  It doesn’t seem very useful for a “working” manager – one who has things of their own to do in addition to managing people below them.  The book never talks about that.  The manager is always available, never has clutter, never seems to be doing anything.  But maybe that’s the trick, to delegate everything.  If one of your goals is to create a report of how successful your department is, do you assign that task to another person to do?

One part of me says that this is correct.  A manager should do nothing but manage the people and tasks and make sure the work gets done.  Another part of me says that it’s not enough and wouldn’t be very fulfilling.

The book also doesn’t discuss how much time a manager must spend in meetings.  The story always has the manager fully available, except for one team meeting.  Surely this manager must have superiors and peers at his level.  What about that time?

A Bottle Sling Design

Many years ago, I was at Disney’s Epcot and I purchased a bottle holder lanyard.  I was fascinated by its simple design.  It’s just a string and a plastic sliding lock to hold the bottle in place.  I searched for a similar lanyard and I was surprised you couldn’t get this design anywhere else.  So I figured I would search for the parts and make some myself and maybe sell them.  Then I found out you couldn’t buy the plastic lock anywhere.  So I put it out of my mind for a while.

Every once in a while, I would look for bottle holders and was always dissatisfied with what I found.  One day I was out on a hike, with my Epcot bottle holder over my shoulder and the idea came to me.  It was such a simple design, I have no idea why I never thought of it before.

I got home from the hike and started prototyping it.  The holder worked very well.  I could make one or two for myself and be happy.  But at the moment, the bigger challenge to me was, can I make them quickly and consistently?  Like if I wanted to really sell them?  So that led me to thinking about automation and harnesses.  The first step would be to make a manual harness for assembly.

Of course, the next day, I decided to search online for my idea and there’s plenty of comparable designs out there.  Not exact, but similar in design and functionality.  So I’m not going to bother with any selling of these.  I may use them as giveaways in geocaches or something.

So, if anyone wants to manufacture these items in quantity, here’s the plans for my harness and instructions on assembly.

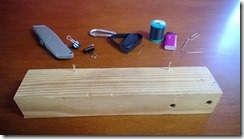
To make the harness, you need a block of wood at least 8 inches long, two small headless nails, two small binder clips, and a large paper clip.  Drive the first nail 7.5” from the edge and the other nail 2.5” from the edge.  That leaves 5” between the nails.  The harness is done.  The other pieces are assembly tools.  Bend the paperclip into a J hook.  Use the smaller hook for the J.

WP_20150124_004

To make the slings, you need: a length of paracord, a spool of polyester button/carpet thread, a strong needle (curved if you can get it), and a length of .25” shrink tubing.

To assemble a bottle sling:

Cut a length of paracord to 7.5”.  This length is from the edge of the harness to the far nail.  This is the benefit of a properly-designed assembly harness, it’s also your ruler.  Melt the ends of the cord to prevent unraveling.

WP_20150124_005

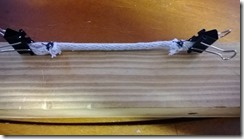
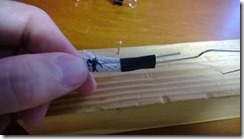
Wrap the cord around the nails leaving an equal amount of cord on each end.  Hold the cord in place on the nails using the binder clips.

WP_20150124_006

Stitch the cord together, creating loops at the ends.  You shouldn’t need more than 3-4 stitches to have a durable sling.  Keep the stitches close to the end of the cord to allow a large loop.

WP_20150124_008

Cut two small pieces of shrink tubing – about .75”.  Make a mark in your harness for consistency.

WP_20150124_010

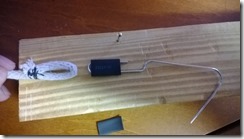
Feed a piece of shrink tubing over the J-hook paperclip tool. 

WP_20150124_011WP_20150124_012

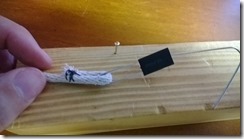
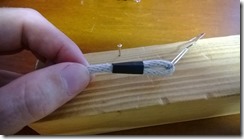
Hook one end of the sling and using the paperclip as a guide, slide the shrink tubing over the sling’s loop.  The shrink tubing should cover the stitching and the end of the cord.

WP_20150124_013WP_20150124_014

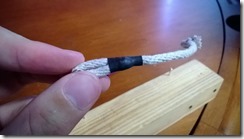
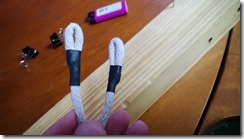
Shrink the tubing over the stitching and repeat for the other end.

WP_20150124_015WP_20150124_016

Loop the sling around the neck of the bottle and tuck one loop through the other.

WP_20150124_017

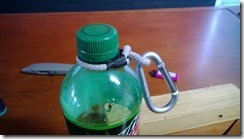
Clip carabineer through end loop to secure sling and attach to anything.

WP_20150124_018

Lewis N Clark Urban Gear Duffel Review

I have two fetishes and I’m not exactly shy about them.  The fetishes are office supplies and luggage.  Both center around the concept of organization.  Like when I go to Staples, I fantasize about owning all this office equipment which necessitates the need for organizational supplies like binders and filing drawers and stands and on and on.

And luggage, well, I just appreciate a well-designed bag that holds just what you need.  Because of this, I am constantly trying to find the right size bag for what I need at the time.  And style has to be considered of course.

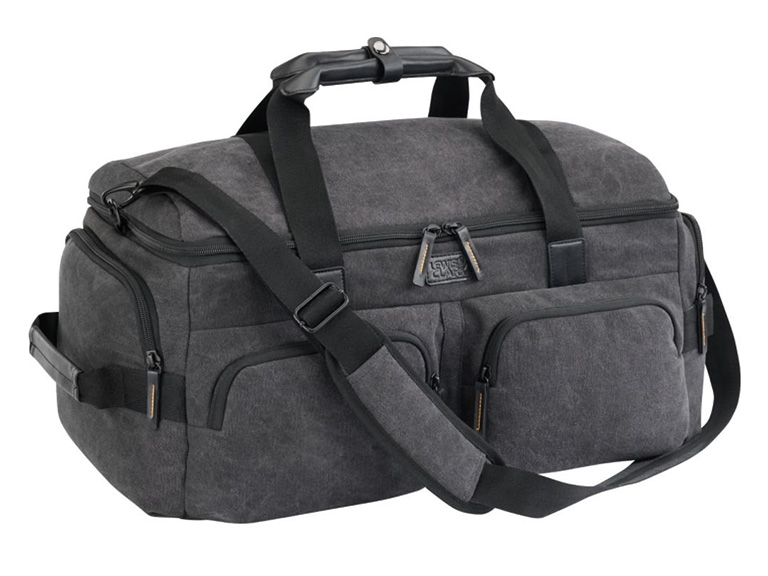
So, this bag came up on Woot:

And I really liked it.  I’ve been using the bag for a while now and I still really like it.  But one thing I never got around to testing was the bag’s capacity.  I assumed I could use it for a week’s vacation, but would that really work?  I mean, it’s only one bag.  But then again, I am a guy.  Guys don’t pack like women, am I right?

Therefore, this post is now the inaugural ManPack Experience.

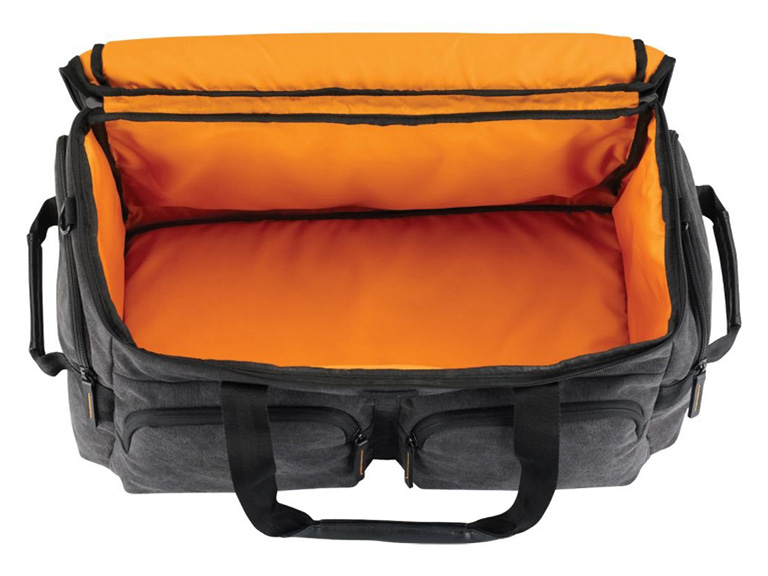
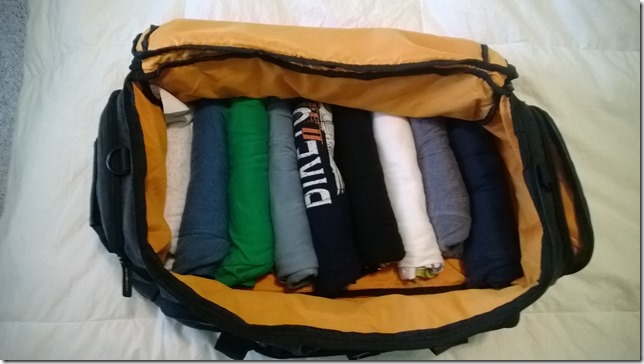
You can see the empty bag above.  First thing I’m going to pack is t-shirts.  I am an advocate of the “rolled” packing style, so if you pack differently, you may get different results.

WP_20140809_005

Nine t-shirts on layer 1.  That also includes sleep shirts.  I also expect I will buy a shirt or two on vacation.  Next up, shorts – because I’m not going to go somewhere that’s cold, duh.

WP_20140809_006

Five pairs of shorts and one pair of jeans.  I could probably swap out a couple of the shorts for pants. Next up, Shirts, socks and underwear.  These fill in the front.

WP_20140809_007

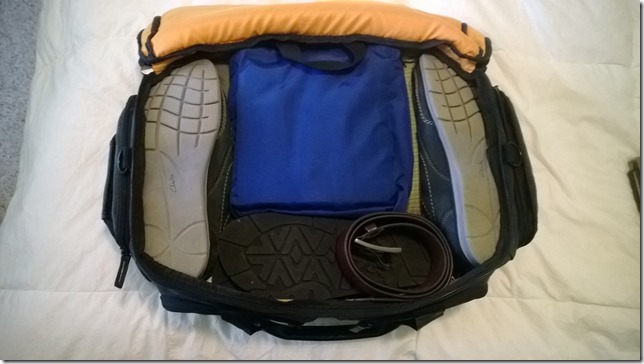
Two button-down shirts, six pairs of socks, eight pairs of underwear.  Next, toiletry bag, shoes and a belt.  Of course, I’ll have the shoes and belt I’m wearing, too, so adding extra shoes is just an example.

WP_20140809_008

A pair of sandals, a pair of loafers, and a belt.  There is still room for more, too.  Probably another pair of pants or a couple shirts.  Now, will the bag close?

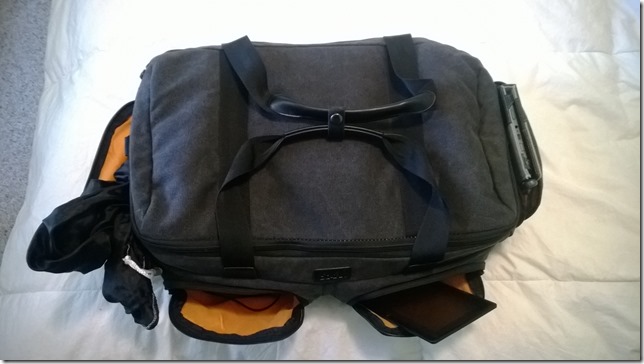
WP_20140809_009

Sure it closes, and there’s more room on the outside.  On the left, I keep a laundry bag for dirty clothes.  On the right, I have my Kindle keyboard in its case.  It’s shown vertically, but does fit horizontally.  Front pocket holds a small tablet, which does fit horizontally.  And I couldn’t think of what else to put in the front.  So fully loaded, what’s the weight?

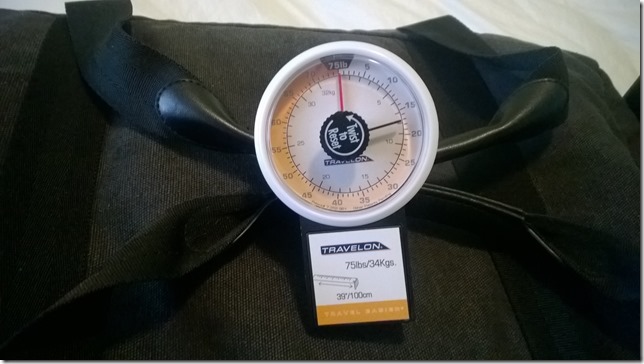
WP_20140809_011

It’s 17 pounds loaded pretty full.  You could stuff it further if you wanted.

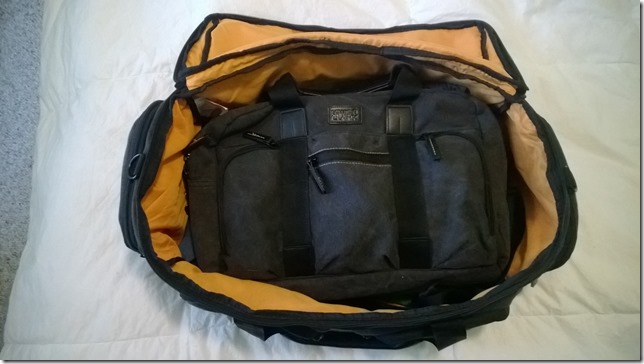
So, this is a great travel bag for multi-day trips.  If you had two bags, you could go for quite a while.  But I don’t travel for long periods, so I am glad for another nice feature of the Lewis N Clark Urban series.  I also bought their laptop bag, and it is a perfect fit inside the duffel.

WP_20140809_012

The laptop bag fits my 15.6” Toshiba laptop just right.  The interior of the bag is very sparse, with just one zippered mesh pouch that I use to hold the power cords.  There is room in the bag for a legal padfolio, which I make use of.  The front pockets hold cables, pens, and a flash drive.

Overall, I think the Urban Gear line of bags from Lewis N Clark is great stuff.

Windows 8 Users, You Need To Do This.

Windows 8 has been around for quite a while and there are still people that are pissed off, frustrated, and confused about it.  It’s all about the Start screen.  People don’t know what it’s about or how to use it.  My initial message to people was, “Get over it.  It’s the Start Menu, just in a different display format.”  Then when they still didn’t get it, it became, “Stop worrying about it, just start typing and search for the program you want.”  Now I have a new message: “Don’t be afraid.”

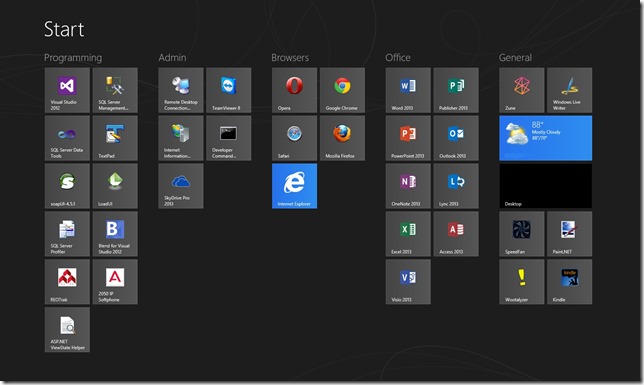
Here’s my Start screen at work.  It is not intimidating; it is not confusing; it is everything that I need to do my job and nothing more.  You can have this in three easy steps.

Start Screen

Now, when I say, don’t be afraid, I mean it.  What you need to do is right-click the hell out of your icons and remove them from your Start screen.  What you want is only the programs you use on a daily basis.  You might be saddened to see how little you use your computer when you seem to have so much software installed on it.  Once you have done that, you will immediately feel less overwhelmed.  DO NOT BE AFRAID.  All of your icons and shortcuts are still searchable, findable, and re-add-able in the All Apps screen.  Trust me, when you have your Start screen finished, you’re going to be freaked out when you see everything behind the scenes.  And that was the old Start menu.

Now for step two, creating groups.  You see that I have five groups of icons, we’ll cover the naming of those groups in step three.  For right now, merge everything into one group, then start dragging icons out of the main group, when you see a highlighted column appear, you will be creating a new group when you drop the icon.  Think in terms of categories.  Don’t worry if your groups are out of order, we can rearrange whole groups in step three.  Originally my first two groups were combined, but there didn’t feel like there was enough whitespace, so I broke some icons out.  it changed my four-column group into 2 two-column groups, and it gave me a new “category”.

Now for the final step three.  Once you have your new, limited icons set up, move to the lower right of the screen where you see the “-“ minus/zoom out icon.  The Start screen will zoom out and you can work on your layout at the group level.  Right-click each group and choose Name Group, then give it a meaningful category name.  While your group is selected, you can drag it into a different position.  Click a blank area of the screen to zoom back in.

Now, take a deep breath and look at what you’ve created.  It’s a launchpad for your work.  Never mind all that hype about live tiles.  Maybe someday it will be worthwhile to hit the start button to get caught up on bunches of little details, then jump back out.  This is more about arranging your desk.

The very first thing you do when you install a new application is take all those new stupid icons off the Start screen.  That is, unless you want to keep the application’s primary shortcut – if it’s something you are going to use very frequently.  If you won’t, get rid of it and find it later via search.