Tag Archives: hobbies

The Happiness Of Having No Timeline

One of my growing hobbies is synth repair.  Buying broken devices and trying to fix them.  In the early days, it was because I wanted to play these devices.  I was building my studio and I needed and wanted these devices to work right now.  Now that my studio is filled, that urgency kind of drops off and things can sit around for as long as they need to before they get fixed, if they ever get fixed.

This Kurzweil keyboard I purchased over a year ago has been waiting for a donor board for a year, and when I finally got one, it had problems too.  So now I have two unusable boards.  But, due to the lack of urgency to fix them, I’m able to take the time as a learning experience and allow myself to make mistakes and try to learn as I go.  So while the end result might be that neither of them work, I’m learning things that lead up to the final diagnosis of unfixable.

When I started, the one board sad it had bad ram and the other said it had a bad CPU.  These are not solvable problems (for me).  However, there are other problems that I can try to solve in the interim.  For example, both boards have bad backlights in their display.  I’ve discovered they use CCFL bulbs instead of EL sheets.  This is new to me, so I’ve learned about the parts and repair of those. 

After swapping the bulb, there was no real change.  I could have given up right there, but based on past experience, a symptom like that suggests a power problem.  The vast majority of electronics problems are power-related.  The extent of my knowledge on that topic is changing capacitors.  I had recently purchased a capacitor tester to support this limit of my knowledge and my tests showed that yes, a cap was bad near the backlight assembly as well as on the power supply section.  Parts ordered. Days go by.

After replacing the caps, the backlight was better, but still not perfect.  So I was on the right track, just needed more digging.  Something most techs start with, but isn’t really in my troubleshooting list is using a multimeter to test voltages.  I usually bypass this step because I don’t really what is good or bad.  I test the voltage at the cap I just changed.  It’s like 4.8 volts.  I have heard and read that most devices either use 12 or 5 volts internally, so it looks to me that there’s an underpower situation.  I probe farther back and its the same low voltage all the way back to the main power section.  I test some of the capacitors in that area and find one that reads bad. 

One of the things I’ve started doing is buying excess of any part I need, assuming that if I needed it once, I’ll probably need it again.  And sure enough, I have a replacement for this cap on hand.  When I flip the board over to unsolder it, I see the soldering points for the voltage regulator right beside it are darkened.  The pieces are starting to fit together.  Capacitors fail from exposure to excessive heat.  Voltage regulator nearby getting hot enough to discolor the circuit board.  Voltages are not to spec.  I pull the voltage regulator and order a replacement (and spares, of course).

So all this time, I have all these parts and tools scattered all over my kitchen table.  It’s a disgusting mess, but I live alone, so who cares?  If I had another spare room, I could have a workshop, but all my rooms already have purposes.  And again, this may be all for naught.  Maybe I do get the backlight working fully and it doesn’t matter because the mainboard is shot.  But the value in learning has been gained.  I did some troubleshooting steps I hadn’t done before and identified issues that I might have made me give up before.

Rack Redux

Last year at this time, I was building my studio and acquiring gear at a pretty good clip.  Some of the new synthesizers I was buying were rackmountable. and I was a little turned off at the cost of buying a prebuilt rack to house them in.  After consideration, I thought maybe I could build one of my own.  It shouldn’t be hard.  It’s a freaking box.  It’s got four sides.  You have a saw and screwdriver, you should be able to do this.

I do have all the tools you would need to accomplish this, and I had a few minor woodworking projects under my belt already.  I had built a shitty platform for my washer and dryer.  I had built a couple of sunglasses racks as well.  I think I was ready to try this.  Spoiler alert, it’s not exactly cheaper to do it yourself, but the satisfaction sort of makes up for it (that’s always what they say, isn’t it?)

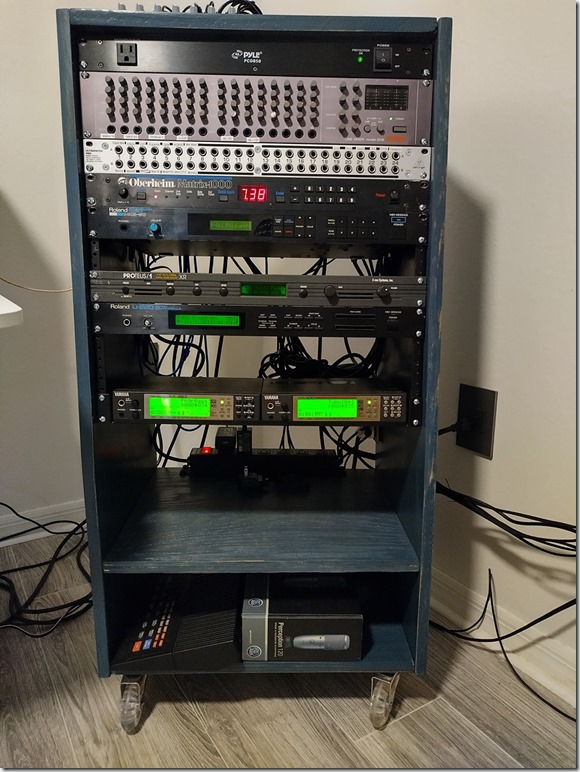
And so I built my first rack.  It was 12U rack with an extra shelf.

IMG_20230327_202801_HDR

Oddly, the stain I chose was supposed to be a light grey (kind of like the floor) and was actually blue.  Whatever, it’s fine.  It’s not like once I started applying the stain I could just undo it.

And this rack served me pretty well for that year.  I outgrew it quickly, though, and I wanted more space.  I needed more space because I was starting to gather up rackmount effect units.  So I began making mental plans to build a second rack.  This old rack would then be dedicated to effects and the new larger rack would be all synthesizers.

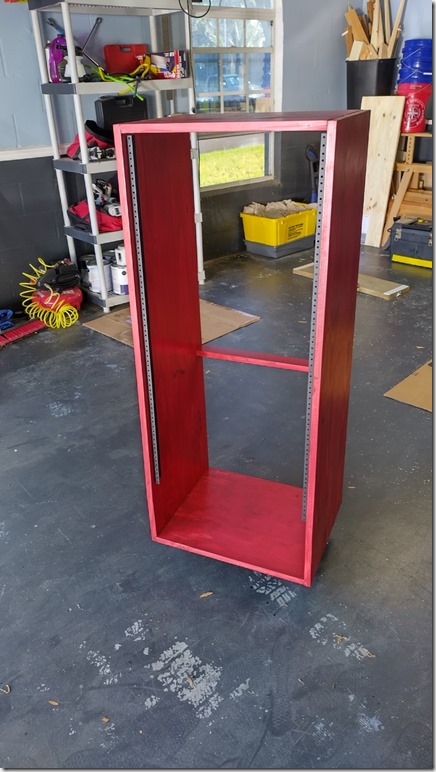
The old rack had a capacity of 12U.  I decided to go big this time and bought 22U rails.  Another thing I didn’t like from v1 is that the floor and shelf of the rack are from some extra scrap wood I had around and this time I wanted the whole thing to have the same wood finish, so I bought extra panels to cut up.  I ended up using 3 of the 4 sheets, so my wood cost went up by only 50%.

I got by by using my 20v tools the first time, but the circular saw was pretty underpowered for the job.  More than once it stalled out cutting through the wood and it never seemed to keep a straight cut.  So this time I bought a high-power corded saw, which is an additional up-front cost, but will be used much more in the future, I’m sure.  I also have a corded drill and when I need that level of power, it’s very nice to have that option.  And the saw did a tremendous job.  i was able to cut the slant on both sides sheets at once, so they are perfectly matched.

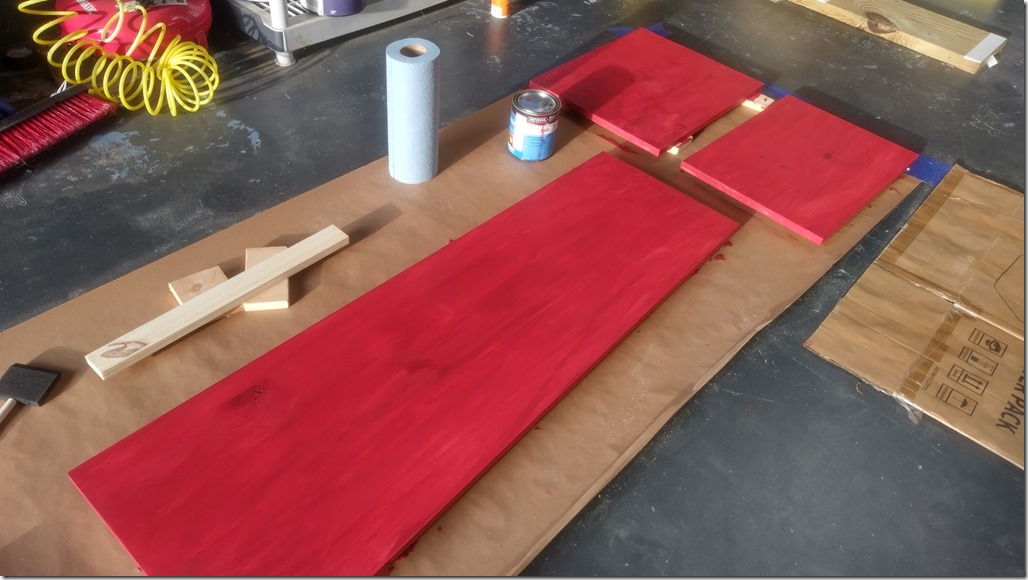
I have wheels from a previous project that I can use, and I’m going to use pocket screws again because they seem really strong, and also because I have a lot of them on hand.  I’m going to double the number of screws I use for extra strength this time.  I’m not going to forgo the wood glue this time.  It makes a world of difference.  I have poly sealant from last time, but I didn’t think I had enough blue stain to cover the new larger size (48" high instead of 38"), so I bought some new stain.  This time, red.  Not red like cherry wood, I mean cherry RED.

IMG_20240317_183822_HDR

Taking some cues from Nord Keyboards, for sure.

Once this is done, as is tradition, it’s only the start of the purchases.  All the equipment from the old rack will be moved to the new one, and that will work as-is.  but when I add more devices, I’ll need to add a second rack mixer.  There’s going to be more devices to power, but I already purchased a larger power strip for install from Woot, who listed one recently, conveniently enough.

Then, looking at the population of the old rack with the effect units that are piling up in my closet, I need to buy a new patchbay to route them.  I have a power switch that I had purchased a while ago from the same place I bought the Roland U-110 and my 32 channel mixer.  And additional power will be available from the power strip already installed in it.  Other than that?  Cables.  Bunches more cables.  Cables to connect the effect units to the patchbay, and maybe some mid-length cables to route between the synth patchbay and the effect patchbay.

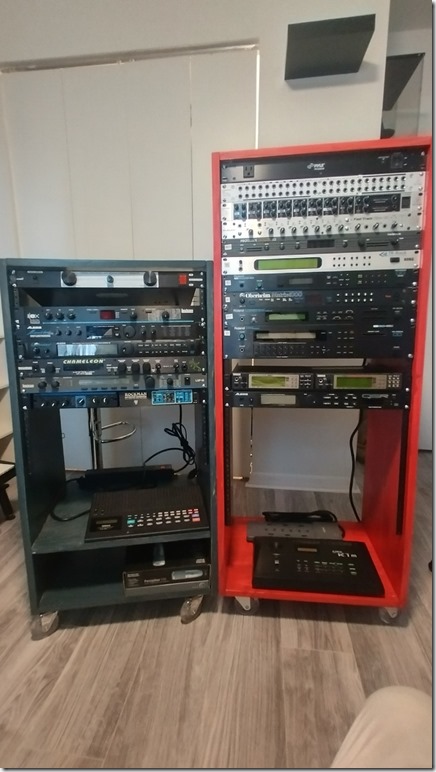
And here’s the new rack:

imageimage

With all the gear swapped out and organized

image

Of course, like every picture, it’s always out of date.  The FX rack now has a patchbay to route to the synth rack and an improved power switch.  The synth rack now has a new entry as well.  So now it’s time to update the 2024 studio purchase log.

The Kurzweil Money Pit

A little over a year ago, my purchasing of keyboards for the studio was peaking, and I was grabbing whatever struck my fancy.  One of the things that came along at that time was a Kurzweil PC3.  It "had problems".  Professional diagnosis said that the main board was bad and would need swapped out.  So I left the device in my rack and waited for another PC3 to come along that needed repair so I could merge the two into one working device.

And it took over a year for something to appear.  This one was the PC3x, which is the 88 key version of the model I had – the 76-key version.  The description, along with demo video, said and showed that the display did not work.  And that was ok with me, because I had a display that did  work.  The asking price was $450, which is a little more than the $300 I paid for the first one, but if these things only appear once a year, I guess I have to get it and go.

I arranged to pick up the device the next day and explained I didn’t care about the screen, but I wanted to know if it had sound.  Time moved slowly and eventually, the seller said they couldn’t confirm if it had sound or not because the display problem prevented any testing.  Well, ok.  I’ll still take it.

And I really overpaid.  I didn’t get what they were saying if I wanted it, just come and get it.  And when I tried to pay them the $450, they were like, no, no, we don’t know if it works or not.  They wanted to give it to me for free.  I drove a hard bargain and gave them $300 instead.  Hindsight is painful, but I’m still ok.

First thing this morning, I started it up.  Initial diagnosis, the screen works.  There’s no backlight.  However, the device is stuck in a rebooting loop.  That’s the repetitive clicking the seller was hearing.  Later in the morning, I have it all disassembled and am running the built-in diagnostics.  The device spontaneously reboots when testing the RAM, but all other tests pass.  Audio can’t be tested because it relies on the RAM, so it reboots on that test as well. 

Ok, so let’s get device #1 and see what we can transplant.  I disassemble the 76-key version and take out the screen.  I figure it will be at least easier if I can see what I’m looking at while testing.  The backlight for the screen is hard-soldered to the main board.  Ugh.  I desolder both, then solder the working screen into the new 88-key.  I go to plug the display board to the main board and… fuck.  The ribbon cable is too short.  Because, duh, a 76-key board is not near as long as an 88-key.

Ok.  Plan B.  Let’s replace the backlight.  I disassemble the display and am very nervous because there’s like no wires to the screen.  It’s some kind of conductive rubber sheet that connects the circuit board to the glass screen.  Then I find out that there’s no EL sheet there – it’s just a big white box with two wires going into it.  I don’t know what that is or how it’s getting lit.  So I go drastic and cut the leads to the existing light and solder them up to an EL sheet I have.  I have to make significant modifications to the metal frame to accommodate the placement of the wires.  Lots of dremel work and hot metal.  This is spiraling out of control.  I get it all put back together, enough to fire it up and… no light.  That was a damn waste. 

Let’s step back a little bit and do some isolated testing.  I take the 76-key display and wire up the power with some extension wires.  I power up the board and the backlight comes on for a brief moment, then goes out.  Hmmm.  Maybe my old display is flaky too?  Or is it possibly a problem with power delivery?

I go back online and do more searches for replacement displays.  Like everything else PC3, there are NO replacement parts available anywhere.  But I found a post of someone who had fixed their backlight and actually provided pictures.  And the replies had even more good info.  Using this info, I bravely cracked open the box on the display board to find the light inside.  It’s not LED, it’s actually fluorescent (cold cathode fluorescent).  Weird, but you know, a lot of computer monitors used CCFL for backlight before LED became cheap enough.

I had cut the leads completely off, so I resoldered the leads back, then soldered that disassembled display to the 88-key board.  When I turned it on, I could immediately see that the bulb was only about a third lit and what was lit was extremely dim.  And like their full-size counterparts, this bulb had the telltale signs of age with the darkened ends.  This is replaceable.  And if I hadn’t found that post and the replies, I would have been simply stuck again.

A site called CFL Warehouse, stocks these bulbs, and they’re not expensive, like $11 each.  And shipping is obscenely cheap, like $2.  So I bought two.  Maybe I’ll fuck one up, and if I don’t, I can replace the bulb in the other display too.  And when parting out the remnants, that should be a decent selling point.

So for now, I’m waiting on parts, like I’m waiting on parts for two other devices sitting around.  And once that’s done, will I be able to go to the next step of swapping components or will both devices have different failures on the same board, making it all pointless?  That remains to be seen.

Spaghetti Is Bad For You

Brainfield studio is down at the moment for renovations.  This is the big push to bring everything online and together, and it’s led me to realize some things that will pain me for a bit.

First, I have a lot of gear.  And up until this point, I had been using it piecemeal and never really had to worry much about connections.  To accommodate it all, I need a lot more connections.  That means lots of wires.  Lots of them.

So to sort of map it all out, the final design will have a 6-keyboard stand, a 4-keyboard stand, and a 2-keyboard stand.  Then there is the rack and mixer, and the monitors.  All of the rackmount devices can be considered one unit as they have a submixer.  So that’s 13 stereo inputs, or 26 channels.  I have a 16 channel mixer.  How will I reconcile that?  Time to level up the studio with a patchbay.

The patchbay sits between connections and lets you override any at will.  So I can have my usual favorite devices connected and if I need to hear a different device, I can patch its output in the patchbay to a free input on the mixer.  It takes a little bit to wrap your head around, but I’m getting to the point that I can’t imagine not doing it this way.  The alternative is having a bunch of cable ends laying on the floor around the mixer and I have to figure out which one I need, unplug something from the mixer and then plug in what I want. It’s also a lot of wear and tear on the mixer ports.

So that sounds lovely, but now, consider what I said, the patchbay sits between every connection.  So while you used to have a connection between the device and the mixer, now you have a connection from the device to the patchbay, and another from the mixer to the patchbay.  That’s more wires.  With my 16 channel mixer, that’s going to be 8 stereo cables, plus the monitor outs.  Because the monitors connect to the patch bay and the mixer outputs connect to the patchbay.  Everything connects to the patchbay.

I have options in which patchbay I choose.  I decided to bite the bullet and buy one that uses TRS (tip ring sleeve), which is functionally equivalent to a stereo jack.  Biting that bullet means that all of my existing mono cables are worthless.  Well, I can still use a mono cable I suppose, but I will be running each port as stereo and I’ll need to buy new TRS to dual mono cables.  That’s going to be pricey.  And on top of those, I also have to buy TRS cables to do the patching on the patchbay.

So there’s that.  That’s the first point.  The second point is:  I have a lot of gear.  It’s not only audio signals I have to concern myself with, it’s also MIDI control.  So I’ll have a few input devices and whole lot of controlled devices.  I have just maxed out my MIDI interface hardware, so I have 9 in and 9 out ports, which is far more than I probably need.  Why so many ports?  Because some devices can be multitimbral and can listen on all 16 channels so they need their own dedicated port.  Monotimbral devices can share a port and each use a unique channel number.  And to accomplish that, I’ll be using MIDI thru boxes to split the signal.  That means I don’t have to have all the devices on for the signal to pass through each one.

But you know what that means, more cables!  And with the added devices spread around the room, I need more cables and longer cables.  So I made up a rough list of what I need to buy to connect everything together.

Audio Cables (TRS to dual 1/4”, aka Insert cable):

  • 3’ – 8
  • 15’– 11

Audio Cables (TRS-TRS)

  • 25’ – 2

TRS Y adapters – 2

TRS Patchbay cables – 6

MIDI Cables

  • 6’ – 1
  • 15’ – 4
  • 25’ – 4

I placed an order with MonoPrice and Amazon to get everything but the 6’ and 25’ MIDI cables.  I have other MIDI cables already and I have some F-F adaptors that can extend a couple cables.  I think that’s going to put me closer to the goal.  If not, I’m just wasting money, but what else is new?

Where From Here?

After updating my studio buying log for the last couple months, I thought I should take a moment and reflect on the journey so far and what the road ahead looks like.

The good news: I have not lost interest in the reconstruction effort for the old tracks.  Even though I’ve been working on them on and off for months now.  And the progress is fairly steady as well.  So far 29 tracks have been reconstructed, which I think is amazing.  There’s only maybe 8 left to do and of those, maybe 3 may have lost data or sounds that are impossible to source or recreate.  The progress is substantial enough that I purchased the device needed for yet a different recording from the era, done on gear not in the original studio.  Gear that was cutting-edge at the time but now is cheaply available.

And that’s sort of the roadmap for this month and next month.  This month is sort of paused on spending since homeowner’s insurance was due and it just feels prudent to keep my expenses level month to month.  But, there is a plan for the next phase.

The next phase obviously is new creations.  I’ve got a massive selection of new devices to work with now and there should be no wanting for any sounds for inspiration.  In order to make that next phase happen, I need to get all those dives out of the closet and set up for play.  That means I need a rack, maybe multiple racks.  There are ten keyboards in the closet right now.  I have my eye on a rack that will hold six of them, which might just be fine.

As far as repairing devices, I’ve done alright.  Most devices that I take in only need little changes.  Like the U220 on the table right now.  It had a completely dead battery and the power button got stuck in when I power it on.  After disassembling it, the plate that held the MIDI message light, which was also the frame for the power switch had become detached.  Just needed superglued back into place.  I think someone though the MIDI message light was a button and pushed it so hard it detached it from the frame.  The Kurzweil was a mystery that I returned to a couple of times and by random chance I seemed to have fixed it by changing the default startup patch.  My suspicion is whatever the previous default patch was had some bad configuration data in it and when it was loading that faulty patch, it caused the sound output settings to get botched.  The wonder of fully software-driven devices.  My Alesis QS8 started exhibiting audio problems after it warms up, so it’s relegated to a MIDI controller right now.  And the faders are still nasty, spewing garbage on the MIDI channel, so its time may be short altogether.

So in summary, the travel has been smooth and the road ahead looks clear and bright.  Barring any unexpected events, the year is looking positive.

Talking About Repairs

My latest project arrived in the mail today.  I’ll discuss that in detail in a bit, but first wanted to recap this whole journey.  I kind of fell haphazardly into the “buy broke and repair” thing with synthesizers.  And I’ve struggled each step, but in general, I’ve been successful and nothing has turned out to be as bad as I thought it was.

The one that started it off was the Alesis.  I thought it needed a change of capacitors to solve a voltage situation.  I changed them out and it made no difference.  but I didn’t break it any worse.  And I eventually got it working by cleaning some faders on another board – a solution that was not even on my radar.  I just got lucky.  That was a cheap thrift store find, so the only worry was disposing it if I ruined it.

Also in my closet is a non-working Roland Juno-Di.  I got it for only $80 at a pawn shop in non-working order.  So far, I have not had any success in fixing it.  In the quest for answers I purchased an oscilloscope.  I honestly don’t know what I’m doing with the scope, so it got me nowhere.  a local repair shop says the know it’s a chip that needs replaced and they’re waiting on parts to come in.  So that’s sitting and waiting.

Next up was an expensive purchase, an Oberheim Matrix 6R, at almost a grand.  and it was advertised as needs work.  Supposedly needs a new battery and a firmware upgrade.  The firmware ship was supplied.  I figured I could change the battery easily enough.  The end result was that the volume fader needed cleaned and that was all.  I swapped the firmware chip easily enough and it’s good to go.  I replaced the caps on the display board and the display looked great, but went wonky again when I reassembled it.  I’ve yet to take it apart and look further.  It’s serviceable right now.

Now for the newest item in detail.  Another expensive purchase of the same cost and same family, an Oberheim Matrix 1000 is the latest on the bench.  When I first got it and tested it, I got maybe a few notes out of it then it went silent.  I popped it open and inspected everything.  Things looked ok.  I cleaned the volume pot, which didn’t change anything.  The problem is, I didn’t know exactly what was supposed to be happening.  From the past repair videos that I’ve watched, I understand that the power supply should be feeding a 5v and 12v power to the board.  I broke out the multimeter and got measurements of less than half a volt.  It sounds impossible that the display would even light up with that little voltage.  That’s where I suspected the problem was, so I found a lone seller on eBay selling a used power supply (untested) for a reasonable price, and I bought it.

I then spent a lot of time watching other videos of repairs of the Matrix 1000, none of which had the problem I had.  But I did learn a couple of important things.  First that patches under #200 might be blanked out on a reset, so they won’t have any sound.  And secondly, that there was an indicator when the device was receiving a MIDI signal.  Hmmm.  With this info, I went back, reassembled the power supply into the device and tried again.  Changing to patch 333 still had no sound, but also, there was no indicator light saying it was getting a MIDI signal either.

And the “fix” was to wiggle the MIDI in jack.  Then the MIDI signal was received and sound was made.  So the problem wasn’t the power supply (but who knows, it may still be.  Now I’ll have something to compare it to).  But that MIDI jack does need changed.  Upon closer inspection, it is loose.  And that actually is a problem that was described in one of the videos I watched.  They swapped out the jack with a similar jack.

I thought about this over dinner.  I don’t know exactly what jack to purchase to ensure the pins line up correctly, and that sounds like a lot of trial and error.  What would be better, I think, is sacrificing one of the other good MIDI jacks and swapping it with the broken one.  I never expect to use the MIDI Out, but I will probably use the MIDI Thru, so I can pull the MIDI Out and use it.

That’s the plan.  I got home from dinner and started setting up the soldering station to remove the jack.  However, unlike capacitors which have two leads and are generally easy to wiggle out while the solder is liquid, this jack has seven pins and you can’t heat all of them at once to release it.  While the solder sucker did ok on most pins, I still could not get it free.  So I did what any frustrated hobbyist would do.  I threw money at the problem.

So I already have a multimeter, a soldering station, and an oscilloscope, what’s next?  Well, what I’ve seen on videos, which is envious, is a desoldering gun.  This device, you put it over a pin, it heats up the pin and solder, you pull a trigger and a vacuum sucks up the solder.  It’s the same as the manual solder sucker, but the soldering gun isn’t in the way.  That would reduce a lot of my frustration, which I’ve had right from the start.  My first repair attempt had me struggling horribly trying to clear a hole that had solder in it.

So that’s where we are right now.  What’s on the horizon?  There’s a synth sitting in a pawn shop where  I had made another purchase.  It’s in sad shape, with rust on the base, plus. it’s a synth I already have.  But, repaired, it can be worth about $450.  I’ll make an offer of $150 and maybe I can bring it up to a level where it can be sold for a profit, or better yet, a trade.

And what purchases can I expect to make during that repair?  I expect I will purchase a EPROM writer so I can upgrade firmware.  Looks like around $100 on ebay.

Painting Looks Fun To Own

The title is a reference to the punchline from an old comic strip where a character wants to get into pottery and buys anything and everything for the hobby, unsure yet of whether the hobby will stick.  With the entire purchase laid out on a large table the question is raised,  what if that hobby fails?  Well, painting looks fun to own.

I’m having a queue problem with my music hobby, and I’m growing the queue for little good reason other than, it looks fun to own.  I’ve purchased a couple more keyboards since the last time I mentioned buying keyboards.  I’m not sure what the total is now.  Barring any "that’d be neat" items I happen across, I only have one more planned purchase to replicate the 700cb studio of the 90’s.  With all those elements, I will be able to work further back in the catalog and rebuild the original songs in higher quality than the old cassette tape of the era.

While that’s the goal in mind, I have a lot of steps I want to complete in order to get there.  i have an actual written list of the things I want to accomplish along the way.  A lot of that list is reducing the stuff I already have, and that’s where the blockages are happening.

I have to sound modules that are just too similar and I don’t need both.  The Yamaha Mu80 and MU100.  However, before I part with the MU80, I decided I should take advantage of the availability of the device by rewriting an old utility program I wrote back around 1996 that would allow the MU80 to be used as an effects unit.  Back then, I wrote it for the PC version, the Yamaha SW60.  I had later advanced to the Yamaha SW1000 in my computer but I never had an MU80 or MU100.  Now is a good chance to do that rewrite.

However, that old utility was written back in 1996, in Visual Basic 6.0.  We’ve moved on a lot since then, so I can only read the code as a guideline and I’m essentially writing the thing from scratch again.  And it’s rather a pain in the ass.  I have no idea how I cranked out that utility so quickly back then.  Youth…

But anyway, writing that program requires my programming desktop to use the MIDI interface, which means I can’t use it for any work on my recording PC.  And I decided I’m going to sell the chintzy novelty guitar I’ve been using for testing the utility, but I can’t really do that until I finish this application.  So it’s blocking me twice.  You know what, i should just use another guitar for testing.  Yes, they’re not as disposable, but they should survive the office environment long enough.

So there, I’ve talked (typed) myself into making a decision.  I can list the dumb guitar on ebay.  And I have CD players and other audio equipment to list as well.  I have a lot of CDs listed and the best have already sold off, so the rest are just taking up time.

In the future, expect something to be said about this dread in the back of my mind.  I have all these devices and nowhere near enough space to store them, set them up, or mixer inputs to plug them in and use them at once.

And also on the hot sheet, one of the devices I bought needs work.  Parts are being ordered and I’ll have another attempt at frustration with soldering.  I went through my pottery stage and I have everything I need to pick it back up again.

So Let’s Do This Again

So, for what seems like the 100th time in my life, I’m getting back into music.  Some things are a little different this time.  The primary difference is $$$.

A quick history of my keyboard collection.  In the 90’s, at the peak of my creative period, I had 3 main keyboards: the Ensoniq ESQ1, the Roland Alpha Juno 2, and the Oberheim matrix 6R.  The Juno and the Matrix 6 were sold off and I added a Casio CZ (varying models over time, but eventually the CZ1, which was top of the line), and later, a Roland RD-600.  A little later on yet, I added a General Music Equinox Pro-88.  I had these 4 boards for a long time, but eventually sold the ESQ1.  Then later, I didn’t think I needed two 88-key boards, so I sold the Equinox.  That left the Casio and the Roland.  And I got by on that.

But, I regret – REGRET – selling every one of those keyboards.  I should have just put them in storage.  I lost a lot of money selling every one.  And that regret has cost me as I try to reclaim those old sounds.

Now to the near present.  I wanted to "remaster" my old recordings and to do that, I needed the original sound devices.  I started from my most recent stuff and am working backwards.  So a lot of my newest stuff, I was using the Yamaha SW-1000 sound card.  This sound card is obsolete for computers now, but there was a professional module called the Yamaha MU-80.  I bought one.  It seemed like it didn’t have the right sounds, so I also bought an MU-100.  That was a wild goose chase, so now I have an extra sound module I don’t need.

Going back further, I needed the sounds from the Equinox.  This synth is quite uncommon.  If it does come up for sale, it ain’t cheap.  I scanned the internet hard, and eventually had to jump on one that suddenly appeared on eBay.  It was only the 76-key model, which was actually better for me.  And that was a big blow to the wallet.  But, it was just what I wanted.

Now inspired, I started seeking out other synths.  I picked up one from Craigslist for $400, a nice sounding Korg I’d never used before.  Then I made a pawn shop run and got a newer Roland synth that needed some help.  That one’s all fixed up and going good right now.  I made another pawn shop run and picked up a dead Roland synth that is queued for professional repair someday.  And along the way, I resurrected an old thrift store purchase that was sitting in my closet.  Finally, I made a long drive to pick up the one synth that started it all, an Ensoniq ESQ1.  Again, not cheap, but still, part of the plan.

I need to be realistic and say I’m probably never going to own another Oberheim.  They are even more expensive than the Equinox I bought.  And the Alpha Juno, I have a great software VST version of it that will suit my needs.

So where am I now?  Let’s take stock (in order of purchase):  Roland RD-600, Casio CZ-1, Alesis QS-8, Yamaha MU-80, MU-100, General Music Equinox, Korg DW-8000, Roland D-70, Ensoniq ESQ-1, Roland Juno Di.  That’s 10 that I count.

And where to put all these?  I only have a stand for two.  They’re in the closet, but they need cases, so now this is my new buying spree.  I’ve purchased 2 used cases in the last few days and I still need two 76-key cases and one more 61-key case.  I have two 88-key cases from when I owned the Equinox Pro-88.

To offset a little of this cost, I’m selling off a lot of duplicate CDs I’ve collected over time.  I also have CD players to get rid of.  Money comes, money goes.  Hobbies keep coming back.

So let’s do this again.

I Can Never Take On A Simple Project

Last weekend, I made a day and hit a bunch of pawn shops, specifically looking for keyboards.  I guess collecting CDs was getting too hard, and collecting CD players was too infrequent, so keyboards is now what I collect.  I had two a couple weeks ago, now I have five.  I’ll figure out something.

So, to keep that story short, I made a deal at the first place I went and the rest of the day was pretty crappy.  For some odd reason, my phone could not keep a GPS signal, so my trip was cut short.  No idea what was up with the GPS, but I hope it’s not a regular happening.

So anyway, at this first shop, they had a keyboard out front – a Roland D70, which is a 76 key synth from 1990.  Not bad.  The original price was $720 and it was marked down to $450.  ehhh, not that great.  But there was a sign nearby that said anything on that table, make an offer. Hmmm.  I did a quick price check and the D70 sells for about $500.  Ok, let’s at least check it out.

I ask to try it and the first thing I see is that the MIDI thru jack is ripped out.  I have no idea how something like that happens.  Not a deal breaker because I wouldn’t need that port, but it is a negotiation point.  It powers up and I start testing the keys.  To my amazement, some of the keys don’t work.  And when I say they don’t work, I don’t mean they don’t make a sound when you press them, I’m saying you could not physically push them down.  Five keys had that problem, all black keys.

The store got a little busy right then, so I had an extended period to consider what level of effort a repair would be.  Absolute worst case, find a dead donor board and swap the keybed.  The electronics seemed fine, the issue was only mechanical.  Time to barter.

Know this about me:  I don’t haggle.  I like to be a people-pleaser.  I don’t like the discomfort of potentially insulting the person who is offering me a service or product.  So I continually tell myself, I don’t need this board.  There’s no reason not to walk away.  I set my price at $250.  Now remember, this is a pawn shop, so it’s likely the person pawning it only got like $100 at most for it, so my price is still giving them a profit.  However, that price was lower than their lowest time-based discount price was.

The salesman came back and I explained the problem and the level of effort I’d have to take to see if it’s even repairable and told him I could only offer $250.  He immediately said, no, I already have $400 into it.  Well, that was quick.  So I was like, ok, I can’t take it.  But I can tell you there’s a repair shop nearby that could fix it for you if you want to get its full value.  I know a pawn shop doesn’t want to sell good stuff; they want to turn over product with as little hassle as possible.  Fuck, they don’t even clean things they put on the floor.  Such a simple thing to increase the value, and they don’t.

He changes his tune quickly, "let me ask the manager."  Yup, just like a car dealership.  However, unlike a dealership, he came back and said, manager says he’ll take $250.  I didn’t have to fight wave after wave of bosses to get the deal.  So, deal done and back home to see what’s up with this thing.

To get to the point, this keyboard had what I’d heard about in repair videos but had never seen yet: the Roland Red Glue.  This glue, in keyboards from 1985-1990, would melt in heat and humidity, loosening the key weights and running into the internals.  The five broken black keys all had their weights fall and that is why they could not be pushed down.  It’s quite funny to me to think that this board might have originally worked well, but because pawn shops suck, they might have left the A/C off at night to save a couple bucks and caused this problem all on their own.  I love that sort of justice.  But anyway, the problem was mine now.

I did some research and found that the usual fix is to soak the keys in drain cleaner to dissolve the red glue and then reattach the weights with epoxy glue.  The recommendation was to use a drain cleaner with lye.  Well, guess what, you can’t get that anymore.  Why?  Goddamn methheads.  Lye is used in making meth.  So I picked up some other cleaner that had some of the chemicals that are associated with lye and hoped that would do the job.

The keys soaked overnight and while it did appear to dissolve all the running glue and freed the weights from the five black keys that had their weights fall, the other key weights were still rock solid.  Solid enough that I broke the plastic on a key trying to pry the weight out.

So the next day, I spent a lot of time scrubbing the keys, to get whatever glue was left (which had turned black) and planned my next move.  In one video, the person said the glue was susceptible to high pH and tested his soaking solution before starting to show it was high pH.  Well, I can make a high pH solution with some pool chemicals.  So I took the broken key as my new sacrificial tester, bought some alkalinity increaser from the pool store, and soaked the key in a solution with a pH off the charts of my pool test strips.  After a few hours, the key weight was as firmly attached as ever.

So at this point, I think I’m just going to fix the five black key weights, buy a replacement key for the one I broke, and put it all back together.  Some part of me says it’s leaving a job unfinished, but another part of me is saying, those other key weights are on there.  And I’m not leaving my keyboards in a non-climate controlled environment anyway, so they should remain solid.  I dissolved all the excess glue that had seeped out, so the only glue left is what is behind the weight.

The replacement key arrived quicker than I expected.  And immediately upon opening, I check it.  Red Glue.  Ok, off into a drain clearer bath overnight.  The next day, I scrubbed the dissolved glue off and installed the key.  I had been waiting for this and had installed every other key in advance.  I put everything back together and powered the board up.

No sound.  Further, the display was completely garbled.  Actually, this is ok.  I’ve heard that you might need to do a memory erase and then go through a tedious process of transmitting data to the device to restore it.  So I download the data file, get the utility program and try.  And try again, and again.  We’re not seeing any success here.  I read a couple more posts about the process and someone comments on turning off a memory protect switch.  Oh yeah, that would help.  A few more tries.  More reading.  Eventually what worked for me was navigating to a system menu, enabling sysex receive, and setting the device id to 17 (why I don’t know).  But then I had sound.

Unfortunately, some of the keys weren’t responsive.  I was too optimistic about their integrity and I probably shouldn’t have been.  So, everything comes apart again and I disassemble the keybed completely again.  Now I have to clean the membrane contacts and pads with alcohol, which wasn’t really as bad as I thought it might me.  I put on some music and went at it.  Two albums later, I was done and reassembling everything.

I had sound and now I had keys that work.  Some of the black keys were more sensitive than others, but that’s livable.  I can tweak any obnoxiously incorrect velocity in the sequencer if I need to.  And that actually wraps up the repair and restore of this device.

In the meantime, I’m buying another keyboard next weekend, which might need some attention, and also the keyboard that started this buying frenzy, the Equinox, needs some care.  The pitch wheel is wonky and I think some of the faders are dirty and spamming the bus.  And I know the battery is low on that, too.  So, no shortage of future projects, let’s hope they don’t become as involved as this one.

The Last Time Is The Charm

In an earlier post, I talked at length about this keyboard that came from a thrift shop and had a problem and how I tried to fix it over and over and eventually gave up and left it sitting in the garage, queued for the dump.  Well, sometimes, I just can’t give up. 

It’s been so cold the last few days that I didn’t want to touch the keyboard, seeing as it’s all metal (official weight: 51.4 lbs. – stupid heavy).  Today was warmer and I left the garage open so it could warm up a little.  After work, I went out and hauled the beast back in for yet another attempt at repair.

Did I have a plan?  Not really.  I was going to take the keyboard assembly out and just deal with the main board through MIDI.  Doing that, I could at least move something in and out of the closet that was probably 30 lbs. less every time I wanted to make another repair attempt.  And with that, I set the massive key bed out and hooked up the synth to another of my keyboards.

MIDI worked,  And enabling a sound on the master keyboard verified there was still the pitch problem.  I dug out the service manual and went through the reset and test modules.  Everything seemed ok from what I could tell.  A couple of the faders didn’t seem to register any movement and I had the pitch and mod wheels disconnected, so some blanks were expected.

Noodling around on the master keyboard, I happened to think to try the pitch wheel and when I moved it, I was very surprised to hear it didn’t work as it should.  The pitch would shift a little bit and snap back to the original incorrect pitch.  That would suggest that the contacts might be dirty, but this is a remote keyboard.  These are MIDI messages being sent and the synth is not honoring them.  Or something else locally is spamming the pitch controller signal.

I finally had a lead I could work with.  I started thinking schematically about what components could cause the pitch wheel to be triggered consistently even when disconnected.  I had the idea I should reconnect the pitch wheel and see if I could stabilize the pitch by holding it a certain amount.  To reconnect it, I had to remove a circuit board that had all the fader controls on it, like volume and four programmable sliders.

When I got the board off, I immediately noticed the connector for the pitch wheel had some trauma.  It was bent at an odd angle.  That seemed suspicious.  I inspected it closely and didn’t see anything broken.  But the faders were disgusting.  And as long as I had this board apart, I thought I’d try out my new chemicals, Deoxit and Deoxit Fader, the latter of which is specifically made for cleaning and lubing faders.

As I cleaned the faders, it was pretty clear they were just shot.  The cleaner was running down the board in a black oil.  But I cleaned them up as best I could.  With the pitch wheel reconnected, I powered the synth back up and tried out a few keys.  It was suddenly in tune.  No drift.  The pitch bend worked locally and remotely.  And that’s the end of this saga.

Reflecting on the "fix", when I very first got the keyboard, it had a pitch problem.  I was the one that disconnected the pitch wheel, so that was not the source of the problem.  One of the faders had to be the culprit – it must’ve had a short somewhere.  But I’m not going to be overly concerned about it from here out.  If the problem comes back, I will just buy a new fader board or maybe the faders themselves, since that is where the problem is centered.

The important thing is I have the keyboard I originally purchased in non-working order, now in working order.  And on a similar topic, I purchased another keyboard on a whim this week.  So I now have five keyboards and a stand that can hold two, so three have to be in storage.  I’m not sure where this is going at the moment, but we’ll see.  One thing for sure, I’m not getting rid of any more keyboards.